
How to request a signature: PDF workflows for multiple signers in DocHub

To request multiple signatures on a PDF, create a DocHub Sign Request, add the recipients, assign each signature field, choose a signing order, and send the document through signer-specific links. After sending, use Manage and Audit to track progress, check email delivery, send reminders, or correct recipient details.
This guide is helpful for document management professionals searching for “request signature PDF” query and considering DocHub as a cloud-based platform to edit, sign, and share PDFs online.
For detailed instructions on placing several signature fields in one file, see our separate guide on adding multiple signatures in eSign workflows.
Disclaimer: The information in this blog post is provided for general informational purposes only and does not constitute formal legal advice.
Summary
A controlled multi-signer process has five main stages:
- Prepare the final PDF and identify every required signer.
- Create a Sign Request and assign form fields to the correct recipients.
- Choose sign in order or all at once before sending.
- Track recipient and document status through Manage and Audit.
- Send reminders, reassign an email address, or void and recreate an incorrect request.
The sections below explain how to complete each stage without relying on separate PDF files or manual follow-up records.
What is a multi-signer signature request?
A multi-signer signature request is a document workflow that asks multiple recipients to complete or sign the same PDF. Each recipient receives access to the document and interacts with the signature fields, initials fields, or other form fields assigned to them.
This process is useful for signed agreements, fillable PDF forms, permission slips, school forms, and other important documents involving multiple signers. For example, a sales agreement may require signatures from a customer, an account manager, and a finance representative.
Unlike adding your own electronic signature to a file, a Sign Request connects recipients, signing order, reminders, status information, and the audit trail to one document workflow.
How do you create a Sign Request for multiple recipients in DocHub?
To get started, log in to your DocHub account or sign up for free. Then, follow the steps below to upload your files in a supported format and send them as PDFs to your collaborators for electronic signatures.
- Open or upload the document.
Open the PDF file from the DocHub dashboard, or upload it from your device, or a supported cloud storage such as Google Drive. Review every page and confirm that the document is ready to send. - Go to the Prepare Sign Request option.
Use Prepare Sign Request to add recipients and insert signature, initials, text, date, checkbox, or other fillable fields. Position each field on the relevant page.
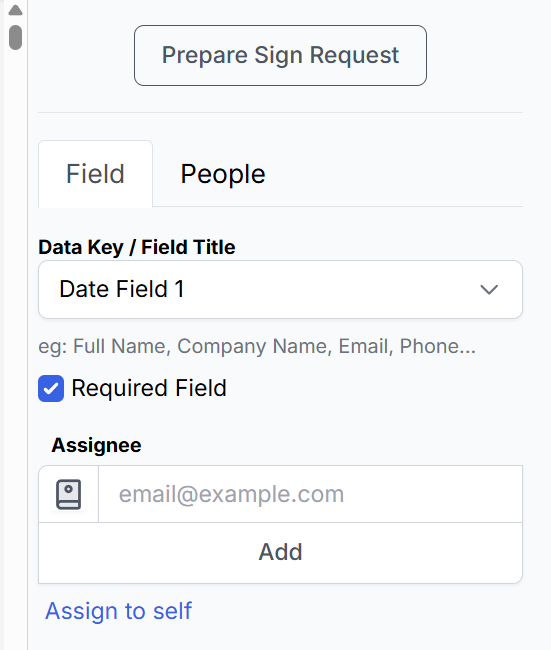
3. Assign every field to the correct recipient. The field assignment determines which signer can complete that part of the PDF.
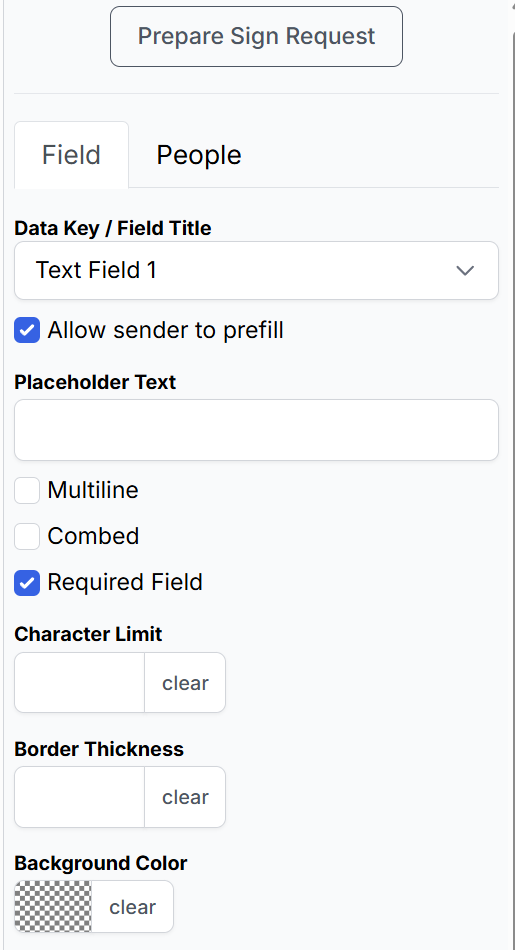
4. Mark essential fields as required and customize them.
Open the Field section and select Required for any field that must be completed before finalization. This is particularly important for signature fields, because a non-required field could be left blank. In this section, you can also set up field parameters, such as line distribution, character limit, background color, and more.
- Choose the signing order.
Select sign in order for sequential signing or all at once for the simultaneous signing process. When using sign in order, drag recipients into the required order before sending.
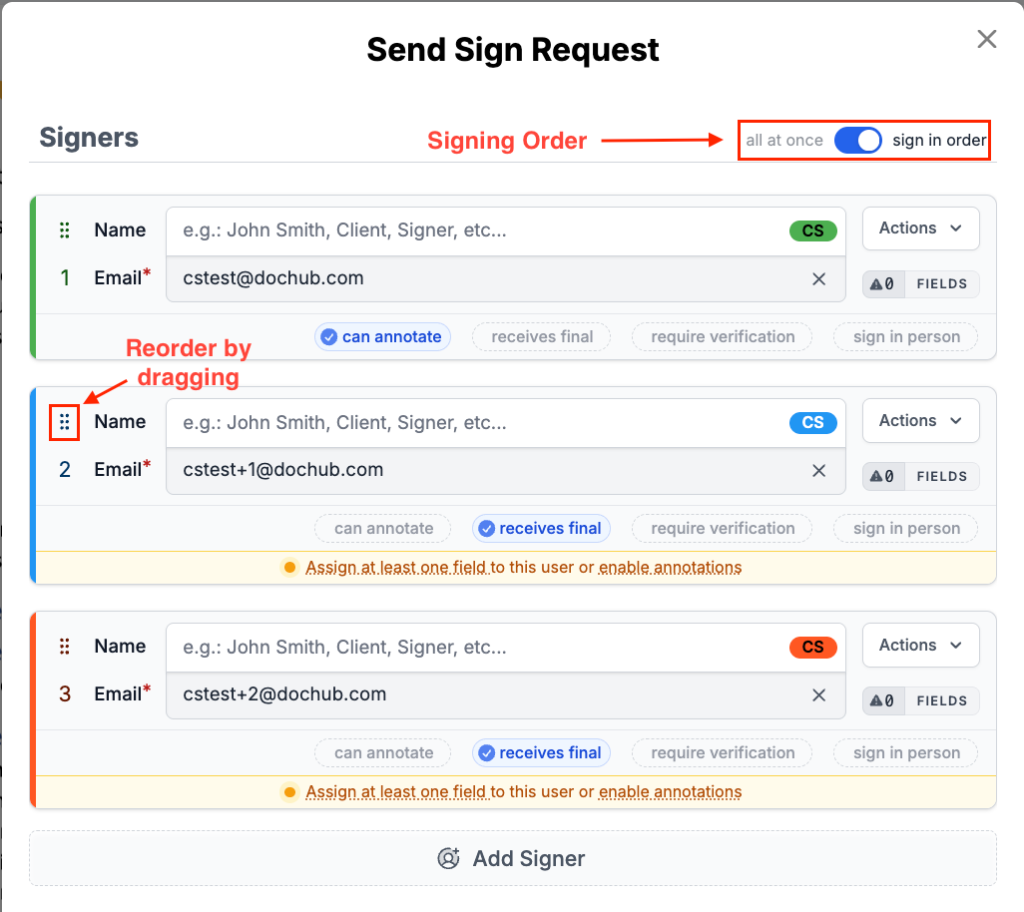
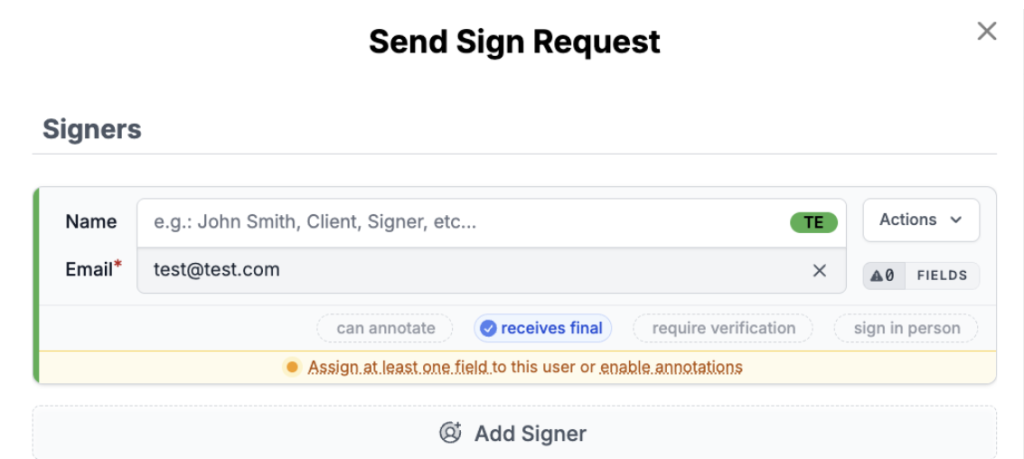
- Customize signer options for each recipient.
Depending on the request, options and permissions can include Receives final, Can annotate, Require verification, and Sign in person. Enable only the options appropriate for the document and its recipients.
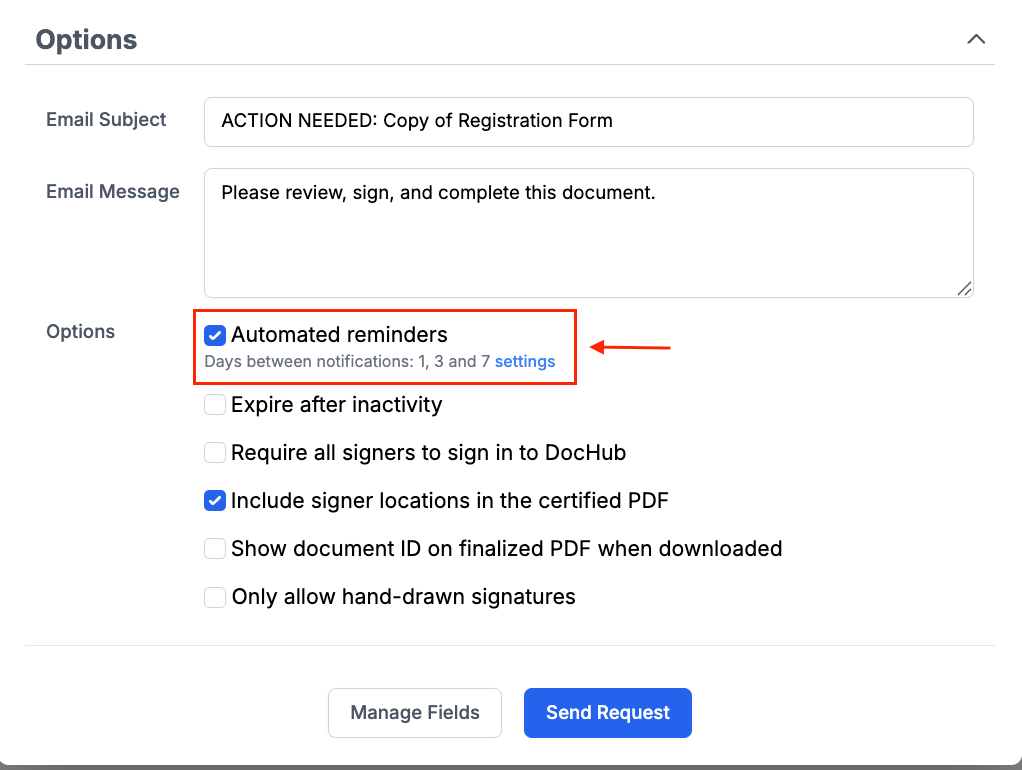
- Set reminders for recipients and the expiration date for the document.
DocHub can send up to three automated reminders. You may also enable inactivity expiration and select a period from 1 to 90 days after the last email reminder; the expiration setting is disabled by default.
- Review permissions and send.
Confirm the request copy owner and who should receive the finalized document. Review the fields, recipient emails, and signing order, and then send the request.
Recipients receive signer-specific links and do not need to create DocHub accounts. If Require verification is enabled, they must also enter a one-time verification code before accessing the request.
How do you track signed PDF documents with DocHub?
After sending, DocHub saves the request in the Sent folder of your Dashboard.

Open the document and select Manage and Audit to review:
- Overall document status
- Individual recipient status
- Assigned and completed fields
- Outbound email delivery
- Signer and document activity
- Available Signer Actions and Document Actions
You can also access the Manage and Audit page directly from your Dashboard. Simply select the relevant document, then open the Actions drop-down menu under the Dashboard tab.
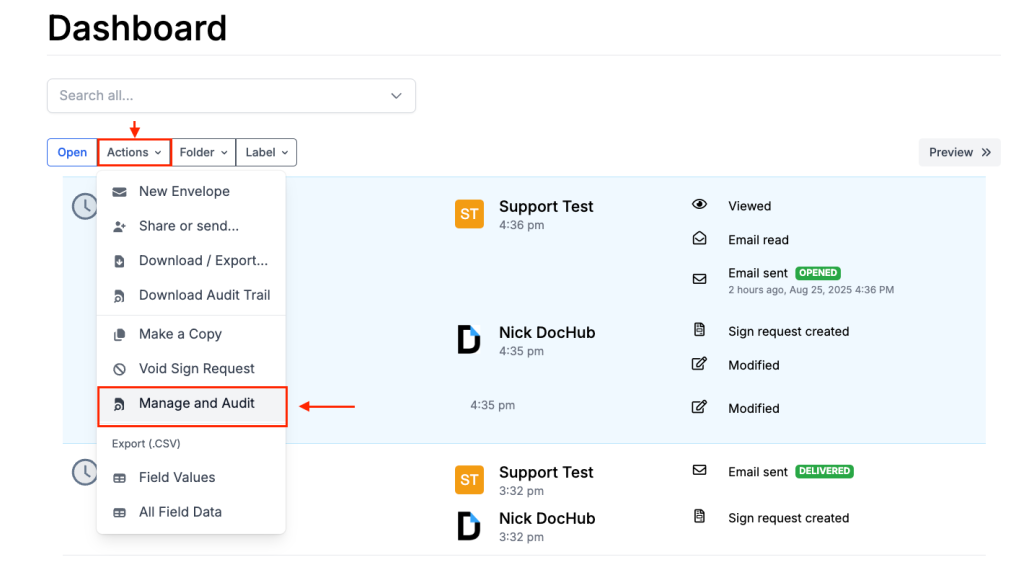
The audit trail creates a chronological record of events associated with the request. Email notifications may appear as delivered, failed, or returned with an error based on the response from the recipient’s server.
This distinction matters when tracking progress. A pending signature may indicate that the signer has not acted, while a failed delivery suggests that the request may not have reached the recipient.
How can you resolve delayed or incorrect requests?
There are two common situations when you may need to edit or cancel signature requests:
Resolve a delayed in-progress request
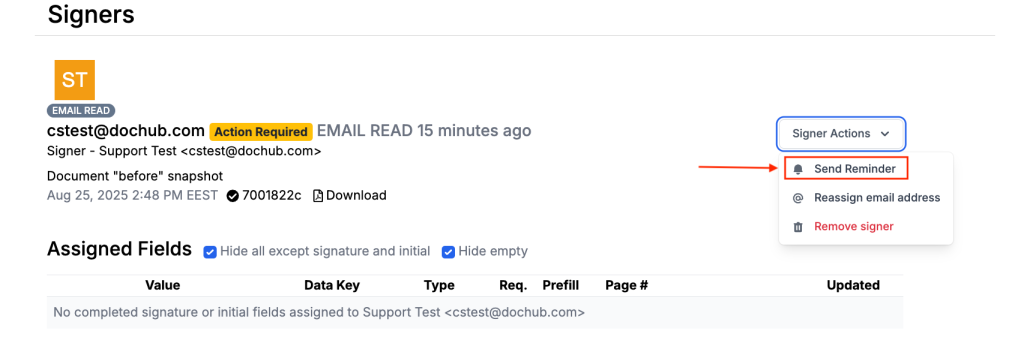
For an unfinished signer, open Manage and Audit and use the relevant Signer Actions:
- Select Send Reminder to manually send another notification.
- Select Reassign email address to replace an incorrect address or transfer the assigned fields to another signer.
- Select Remove signer when the recipient should no longer participate.
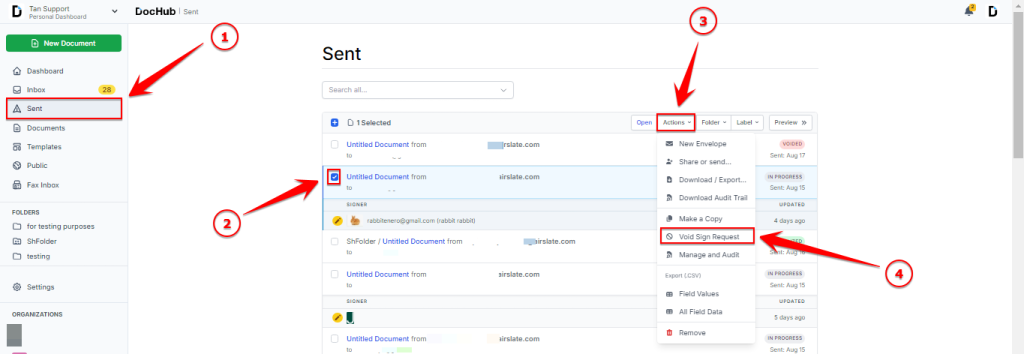
Void a sign request
To cancel the entire in-progress request, use Actions to void it. Voiding prevents recipients from continuing to access the Sign Request.
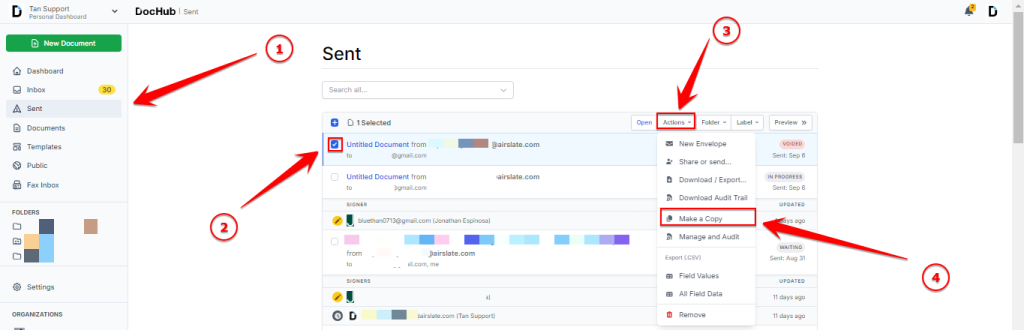
If the PDF, signing order, or required fields must change, select Make a Copy, correct the new copy, and send it as a new request. This method also applies when a signer finalized a document without signing because the relevant signature field was not marked Required.
How does DocHub handle rejected sign requests?
When a signer rejects a sign request after receiving it, the sender will automatically receive an email notification alerting them of the rejection. This allows the sender to quickly follow up with the signer to address any concerns or make any necessary changes before resending the document for signature.
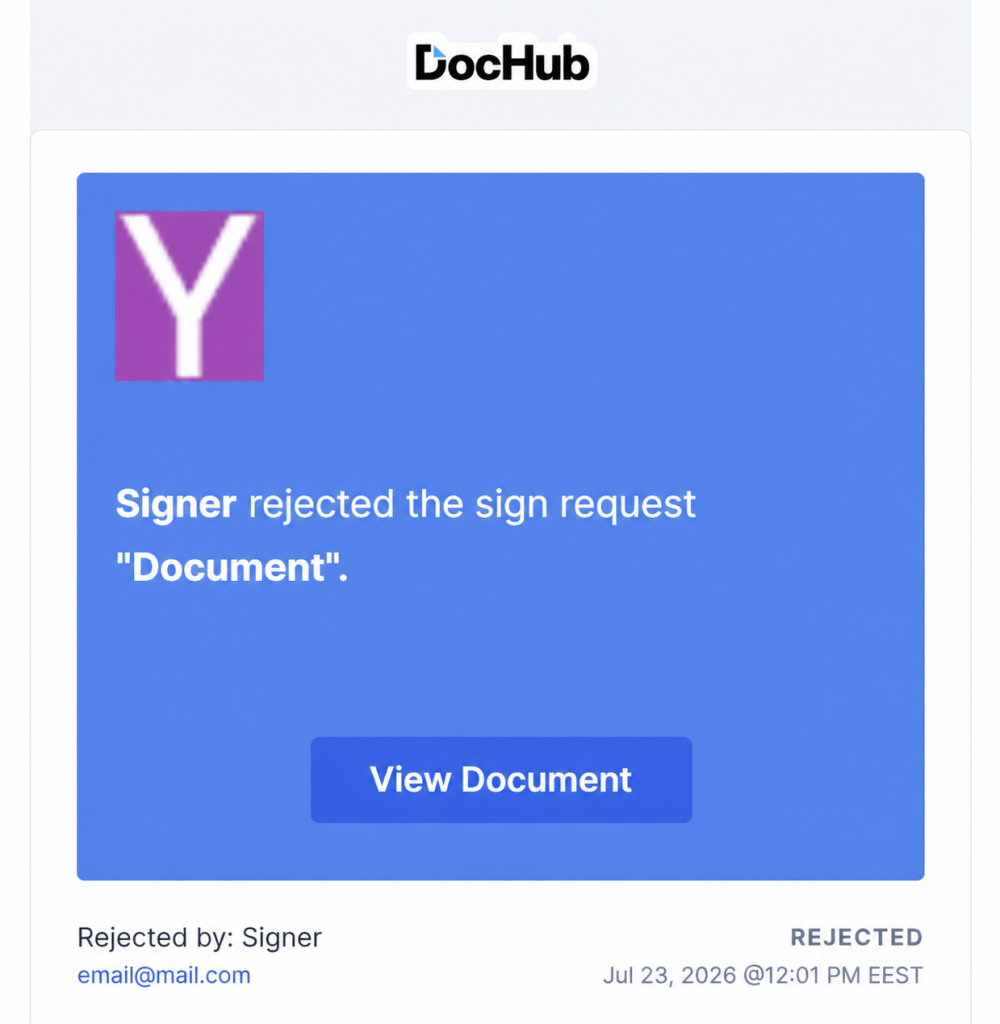
You can also track this in your DocHub account dashboard, where the document will display a Sign Request Rejected status in the Sent folder.
How is a managed Sign Request different from email-based signing?
Sending separate attachments by email may work for a simple one-person request, but it becomes difficult to manage when several recipients return different versions.
DocHub’s Sign Requests vs. signing via email
A DocHub Sign Request keeps multiple signers, field assignments, reminders, delivery status, and audit information connected to the same document when collaborators sign PDF documents online. It also avoids repeated printing, scanning, downloading, and manually combining signed PDF files.
For a small business managing recurring contracts or approval forms, a reusable template can further reduce setup work by creating a new request copy while preserving the original template.
Security and legal points to consider
DocHub uses signer-specific access links and can add one-time verification when Require verification is enabled. Documents signed on DocHub can be downloaded as a PDF with an embedded digital signature. This signature verifies the document’s authenticity and guarantees that it has not been tampered with or altered in any way. Organizations should still determine the appropriate authentication, access control, retention, and evidence requirements for each document type.
Final thoughts
DocHub lets senders create a structured signature request, control signing order, review request status, and address stalled or incorrect requests from one workflow. It is useful when businesses need to get PDF documents signed online without managing separate attachments and manual follow-up records.
Get started with DocHub to send your next multi-signer PDF and manage the request through finalization.
Glossary
Audit trail: A chronological record of events associated with a document and its recipients.
Field assignment: The connection between a fillable field and the person responsible for completing it.
Parallel signing: A workflow in which multiple recipients can complete assigned fields at the same time.
Sequential signing: A workflow in which recipients act one at a time in a defined order.
Sign Request: A DocHub workflow used to send a document to one or more people for completion or electronic signing.
FAQ
1. What happens when a Sign Request email cannot be delivered?
The audit trail may display an error or failed status based on the recipient server’s response. Verify the address and use Signer Actions > Reassign email address to send the request to the corrected recipient.
2. Can a DocHub Sign Request expire automatically?
The sender can enable inactivity expiration for 1 to 90 days after the last email reminder. This option is disabled by default and must be configured before sending.
3. Can I download the audit information?
DocHub lets senders view and download audit information for signed documents, where available. You can choose between downloading a document, an audit trail, or a document with an audit trail.
4. Can a signer complete the request on a mobile device?
Yes, they can. When receiving DocHub sign requests, your recipients can open the signer-specific link on any compatible device with an internet connection. DocHub’s mobile app also lets you add multiple signers to a PDF using your phone.
5. Can I request multiple signatures for my PDF directly from a browser?
Yes, you can. DocHub’s extensions for popular browsers like Chrome and Edge allow you to request multiple signatures directly from your browser. This makes it easy to manage and track all your PDF signing requests in one place.
- Summary
- What is a multi-signer signature request?
- How do you create a Sign Request for multiple recipients in DocHub?
- How do you track signed PDF documents with DocHub?
- How can you resolve delayed or incorrect requests?
- How does DocHub handle rejected sign requests?
- How is a managed Sign Request different from email-based signing?
- Final thoughts
- Glossary
- FAQ