Do not select print on 2026

Get Form
Do not select print on Preview on Page 1

Here's how it works

01. Edit your form online
Type text, add images, blackout confidential details, add comments, highlights and more.
02. Sign it in a few clicks
Draw your signature, type it, upload its image, or use your mobile device as a signature pad.
03. Share your form with others
Send it via email, link, or fax. You can also download it, export it or print it out.

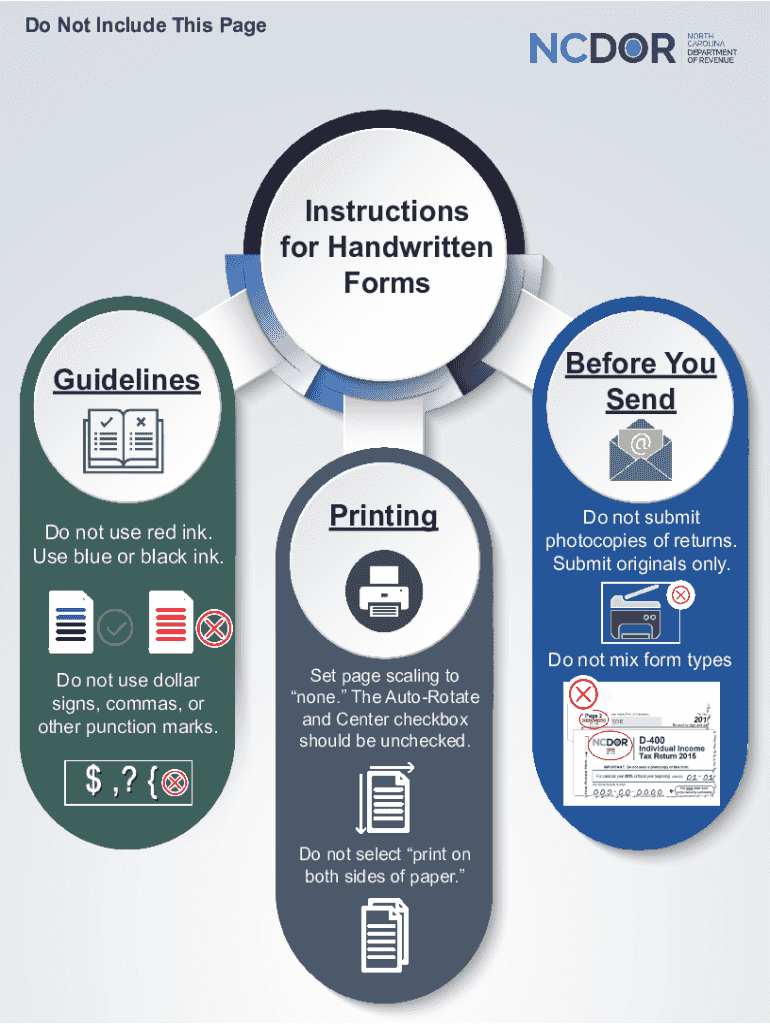
Definition and Meaning of "Do Not Select Print On"

The "Do Not Select Print On" form primarily serves as an instruction or guide, often related to document formatting or printing preferences within digital platforms. It acts as a directive aimed at ensuring specific sections or elements of a document should not be selected for printing. This directive helps optimize the document's appearance and utility by excluding irrelevant or non-essential parts from the final printout. By understanding the intent behind this instruction, users can manage their printing tasks more effectively, minimizing waste of resources like ink and paper while ensuring essential content is preserved accurately.

Steps to Use "Do Not Select Print On"

  1. Identify the Sections or Elements:

    • Review the document to determine which portions are marked with "Do Not Select Print On."
    • These sections might include instructional text, drafts, or elements meant solely for digital viewing.
  2. Prepare the Document:

    • Open the document in a compatible editing software such as DocHub.
    • Utilize the document's editing or viewing features to highlight the areas marked with the instruction.
  3. Adjust Print Settings:

    • Access the print settings in your document editor and ensure only the desired sections are selected for printing.
    • Use options like "Print Selection" or "Print Current Page" to restrict the output to specific sections.
  4. Preview and Verify:

    • Use the preview feature to double-check that only the necessary sections are set to print.
    • This helps prevent accidental inclusion of unwanted sections.
  5. Execute Printing:

    • After confirming the print settings, proceed with printing.
    • Ensure the printer is configured correctly to handle the selected pages and output type.

Why Should You "Do Not Select Print On"

Adhering to the "Do Not Select Print On" instruction is critical for several reasons:

  • Resource Efficiency: By excluding non-essential parts of a document, you conserve ink and paper, reducing waste and operational costs.
  • Document Clarity: Printing only relevant content ensures that the final document is focused and free from clutter, which can improve readability and professionalism.
  • Compliance and Security: Some parts of a document may contain sensitive information or internal reviews intended solely for electronic use. This instruction helps maintain confidentiality and regulatory compliance by limiting physical distribution.
  • Environmental Responsibility: By minimizing unnecessary printing, you contribute to an eco-friendlier practice.

Key Elements of "Do Not Select Print On"

Understanding the key components involved in this instruction is crucial:

  • Markers or Annotations: Certain documents may explicitly mark sections with "Do Not Select Print On" to guide users.
  • Software Tools: Document management platforms like DocHub offer features to easily identify and exclude these sections during the editing and printing process.
  • Print Settings Customization: Users must be familiar with adjusting print settings, ensuring the directive is followed correctly.

Who Typically Uses "Do Not Select Print On"

This form is utilized by a variety of professionals and entities, including:

  • Office Administrators and Assistants: To prepare documents for meetings, presentations, or internal distribution, ensuring only necessary information is printed.
  • Legal and Compliance Teams: To manage sensitive legal documents, preventing unauthorized sharing or creation of hard copies.
  • Educators and Students: To print assignments or notes while excluding instructions or digital-only materials.
  • Environmental and Cost-Conscious Organizations: As part of a strategy to minimize environmental impact and control stationery expenses.

State-Specific Rules for "Do Not Select Print On"

Though generally applicable across various domains, certain states or institutions may have specific rules regarding document preparation and printing:

  • California: Emphasizes digital transformation, encouraging digital-native documentation practices and minimizing reliance on paper.
  • New York: Offices may have regulations on maintaining confidentiality and data protection, which includes selective printing as a practice.
  • Texas: Business compliance may involve ensuring sensitive sections aren’t printed, aiding in upholding security standards.

Digital vs. Paper Version Considerations

When dealing with the "Do Not Select Print On" directive, consider the pros and cons of digital versus paper versions:

  • Digital Versions:

    • Allow for interactive features such as hyperlinks or comments that can enhance understanding.
    • Facilitate easy updates and sharing without incurring printing costs.
  • Paper Versions:

    • Provide a tangible reference for meetings or records, but require mindful adherence to printing instructions to avoid unnecessary hard copies.

Understanding these elements can help users appropriately navigate printing tasks, ensuring efficiency and compliance across various scenarios.

be ready to get more

Complete this form in 5 minutes or less

Get form

Got questions?

We have answers to the most popular questions from our customers. If you can't find an answer to your question, please contact us.
Contact us
Cancel printing from Windows On the Windows taskbar, at the bottom-right corner of the screen, right-click the Printer icon. Select Open All Active Printers. In the Active Printers dialog box, select the printer you want. In the printer dialog box, select the print job you want to cancel. Select Document Cancel.
To save printer settings as default, access your printers properties or preferences through Windows Settings (Printers scanners) or the Control Panel, disable Let Windows manage, select your printer, and find options like Printing Defaults or Save Current Settings as Preset within the driver to make changes that apply to all future print jobs. For Windows 10 11 This video demonstrates how to change your default printer in Windows 11: 47sMDTechVideosYouTube Jul 23, 2021Open Settings: Press Windows key + I to open Settings, then go to Bluetooth devices Printers scanners. Manage Default Printer: Scroll down to Printer preferences and turn off the Let Windows manage my default printer toggle. Select Printer: Click on the specific printer you want to set as default. Set as Default: Click the Set as default button. Access Preferences: Click Printer properties or Printing preferences for that printer. Set Defaults: Look for tabs like Advanced, Printing Defaults, or Presets, make your desired changes (e.g., paper size, quality, duplex), and click OK to save. From within an Application (Windows macOS) Watch this video to learn how to change your default printing preferences in Windows 11: 1mFast GuidesYouTube Nov 19, 2024Open Print Dialog: With a document open, go to File Print. Choose Printer: Select your printer from the list. Show Details/Options: Click Show Details (macOS) or look for options to access more settings. Save Preset: Find the Presets menu and select Save Current Settings as Preset, give it a name, and click OK. Key Tips Printer Properties vs. Printing Preferences: Properties often sets system-wide defaults (Advanced tab), while Preferences affects the look and feel for most applications, says Epson Caribbean and Brother USA. Update Driver: Ensure your printer driver is up-to-date for the best functionality, notes Microsoft Learn. Check Manufacturer Software: Some brands (like HP) have dedicated software where you can create and save custom shortcuts. How can I permenantly save my custom settings in Printing Shortcuts for my MFP M281 and Windows 10 Sep 26, 2018HPSet a default printer in Windows - Microsoft SupportSelect Start and then select Settings Bluetooth devices Printers scanners . Or. Select the following Bluetooth devices Microsoft
Option 1. Adjust PDF Print Settings Most PDF viewers (like DocHub Reader) offer scaling options that can prevent border clipping: Open the PDF and go to File Print. In the print dialog, look for Page Sizing Handling. Select Fit, Shrink oversized pages, or Scale to printable area. Jul 16, 2025
How to prevent a PDF from being printed with DocHub Open the PDF file you want to password protect and press Protect a PDF in the All tools menu. Click on Encrypt with password in the sidebar. In the Password Security settings, tick Restirct editing and printing and set Printing Allowed: to None.
0:55 2:33 Click document from the menus. And then cancel. Or if you have multiple documents click printer fromMoreClick document from the menus. And then cancel. Or if you have multiple documents click printer from the menus. And then click cancel all documents.

Security and compliance

At DocHub, your data security is our priority. We follow HIPAA, SOC2, GDPR, and other standards, so you can work on your documents with confidence.

Learn more
ccpa2
pci-dss
gdpr-compliance
hipaa
soc-compliance
be ready to get more

Complete this form in 5 minutes or less

Get form

People also ask

1:07 2:30 In the preferences window go to the general. Tab. Now look for always open PDFs after printing andMoreIn the preferences window go to the general. Tab. Now look for always open PDFs after printing and uncheck. It. Always open PDFs from printer uncheck it then click okay and close your PDF document.
Right-click your PDF file and choose Make secure PDF. Open the Printing Viewing tab. Untick Allow printing (if it isnt already).
Stop prompt to save a file when printing - Windows Click File Print. The steps for printing may vary depending on the application youre using. Uncheck Print to file. Click Print or OK, depending on your application. Your document should now print properly.

Related links