Get the up-to-date Microsoft PowerPoint - Women's Chamber Presentation 7-27-2011 ppt Read-Only Compatibility Mode DoD G-2024 now

Get Form
Microsoft PowerPoint - Women's Chamber Presentation 7-27-2011 ppt Read-Only Compatibility Mode DoD G Preview on Page 1

Here's how it works

01. Edit your form online
Type text, add images, blackout confidential details, add comments, highlights and more.
02. Sign it in a few clicks
Draw your signature, type it, upload its image, or use your mobile device as a signature pad.
03. Share your form with others
Send it via email, link, or fax. You can also download it, export it or print it out.

The best way to modify Microsoft PowerPoint - Women's Chamber Presentation 7-27-2011 ppt Read-Only Compatibility Mode DoD G online

Form edit decoration
9.5
Ease of Setup
DocHub User Ratings on G2
9.0
Ease of Use
DocHub User Ratings on G2

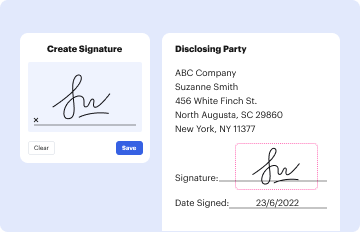
With DocHub, making adjustments to your paperwork takes only a few simple clicks. Follow these quick steps to modify the PDF Microsoft PowerPoint - Women's Chamber Presentation 7-27-2011 ppt Read-Only Compatibility Mode DoD G online free of charge:

  1. Register and log in to your account. Sign in to the editor using your credentials or click Create free account to examine the tool’s functionality.
  2. Add the Microsoft PowerPoint - Women's Chamber Presentation 7-27-2011 ppt Read-Only Compatibility Mode DoD G for redacting. Click on the New Document option above, then drag and drop the file to the upload area, import it from the cloud, or using a link.
  3. Modify your file. Make any adjustments required: add text and photos to your Microsoft PowerPoint - Women's Chamber Presentation 7-27-2011 ppt Read-Only Compatibility Mode DoD G, underline information that matters, remove parts of content and substitute them with new ones, and insert symbols, checkmarks, and areas for filling out.
  4. Complete redacting the template. Save the modified document on your device, export it to the cloud, print it right from the editor, or share it with all the people involved.

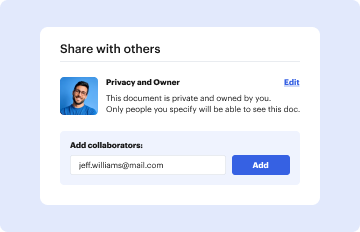
Our editor is super intuitive and efficient. Try it out now!

be ready to get more

Complete this form in 5 minutes or less

Get form

Got questions?

We have answers to the most popular questions from our customers. If you can't find an answer to your question, please contact us.
Contact us
Select File Info. Select Protect Presentation, point to Restrict Access, and then select Restricted Access. In the Permission dialog box, select Restrict permission to this presentation, and then select More Options.
Enable editing in your presentation Go to File Info. Select Protect presentation. Select Enable Editing.
On the Review tab, under Protection, select Permissions, and then select No Restrictions. In the dialog box, select Remove Restrictions.
Enable editing in your presentation Go to File Info. Select Protect presentation. Select Enable Editing.
To turn off read-only mode in PowerPoint, follow these steps: Locate the PowerPoint presentation file in Windows Explorer. Right-click on the file and select Properties from the context menu. In the Properties window, under the General tab, uncheck the Read-only attribute at the bottom.
be ready to get more

Complete this form in 5 minutes or less

Get form

People also ask

Select File Info. Select Protect Presentation, point to Restrict Access, and then select Restricted Access. In the Permission dialog box, select Restrict permission to this presentation, and then assign the access levels that you want for each user.
Common Reasons Why Editing is Disabled in PowerPoint If you find that you cannot edit a PowerPoint presentation, some common reasons include: The presentation is read-only or password-protected. The presentation is blocked by administrative policy. The PowerPoint application has encountered an error or malfunction.
Turn off compatibility mode On the File tab, click Save As. In the Save As dialog box, in the Save as type list, click PowerPoint Presentation (*. pptx). Click Save.

Related links