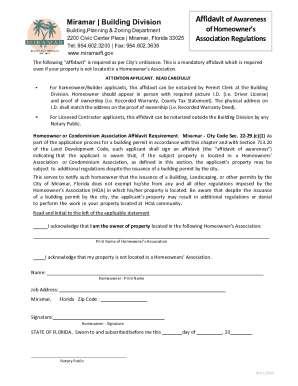
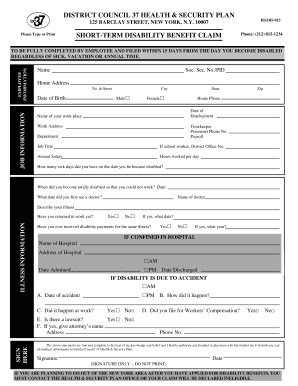
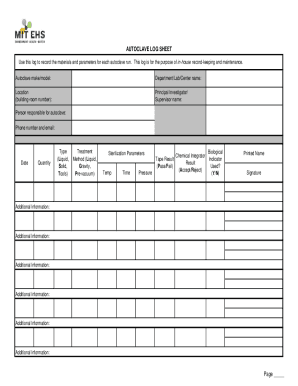
Get and handle Gravity summary Order Forms online

Accelerate your document management with our Gravity summary Order Forms category with ready-made document templates that meet your requirements. Get the document, edit it, complete it, and share it with your contributors without breaking a sweat. Start working more efficiently together with your documents.

The best way to manage our Gravity summary Order Forms:

  1. Open our Gravity summary Order Forms and find the form you want.
  2. Preview your form to ensure it’s what you want, and click Get Form to start working on it.
  3. Change, add new text, or point out important information with DocHub tools.
  4. Fill out your form and save the modifications.
  5. Download or share your form with other people.

Discover all of the opportunities for your online document management with the Gravity summary Order Forms. Get your totally free DocHub account today!

Video Guide on Gravity summary Order Forms management

video background

Commonly Asked Questions about Gravity summary Order Forms

Sticky List is an add-on for the WordPress plugin Gravity Forms that lets you list and edit entries from the front end. You can display a list on the front end where users can view, delete and edit submitted entries.
You can access all WPForms entries in your WordPress admin area. To do so, go to WPForms Entries. Here, youll see a list of all the forms on your site, along with their entry counts. You can customize the graph on the Total Entries page using the date range dropdown in the top right corner.
Showing Gravity Forms entries on a page, a step-by-step guide the GravityView add-on. Create a new View and link your form as the data source. Select which layout you want to use to display your form entities. Construct your layout using GravityViews drag-and-drop builder. Embed your View on a page or post.
Gravity Forms collects all completed form submissions within your WordPress admin dashboard. You can access them by clicking or hovering over Forms in the left hand dashboard navigation ⓵, and then choosing Entries ⓶. See screenshot below. From here you will be presented with a list of Entries.
Add the form to your site. Download Gravity Forms. Upload the Gravity Forms plugin to WordPress. and activate the plugin. Add the license key. Configure general plugin settings. Create a form. Add the form to your site. Form Editor.
Click the Embed button at the top of the Gravity Forms user interface to open a menu of all the available embed options with Gravity Forms. Click the Copy Shortcode button. This is located at the bottom of the menu. In your clipboard, the shortcode will look something like this: [gravityform id=23 title=true].
Displaying all field values from a Gravity Forms submission Go to the form settings and click on Confirmations or Notifications on the left. Now, scroll down to the message box and add your chosen text along with the {allfields} merge tag.
How to Export Gravity Forms Entries to CSV, Excel, or XML Step 1: Create a New Export. Step 2: Customize Your Export Columns. Step 3: Configure Your Export Settings. Step 4: Download the Exported Data.