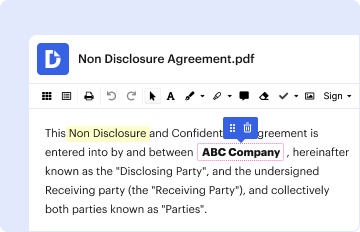
Type text, add images, blackout confidential details, add comments, highlights and more.
02. Sign it in a few clicks
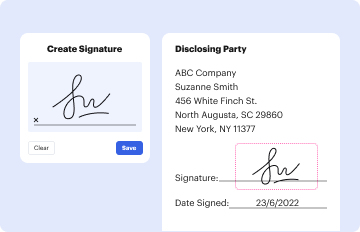
Draw your signature, type it, upload its image, or use your mobile device as a signature pad.
03. Share your form with others
Send it via email, link, or fax. You can also download it, export it or print it out.
How to use or fill out diagonal peyote stitch with our platform
Ease of Setup
DocHub User Ratings on G2
Ease of Use
DocHub User Ratings on G2
Click ‘Get Form’ to open the diagonal peyote stitch document in the editor.
Begin by reviewing the materials section. Ensure you have all necessary beads and tools listed, such as cylinder beads in colors A and B, jump rings, and beading needles.
Follow the instructions for Leg 1. Start by picking up the specified number of beads and tying them into a ring. Use our platform's annotation tools to highlight important steps or add notes for clarity.
Continue through each leg of the stitch as outlined, using our editor to mark completed steps or add comments on your progress. This will help keep track of your work.
Once you reach the assembly section, utilize text boxes to jot down any adjustments or personal touches you wish to incorporate into your design.
Start creating beautiful beadwork today by utilizing our platform for free!
12:51 31:38 And then a stack of beads to make that increase. So Im going to pick up two As. And a B. And ImMoreAnd then a stack of beads to make that increase. So Im going to pick up two As. And a B. And Im going to drop these. Down.
How to increase and decrease Kandi?
Starting the Base: Begin by selecting two colors and stringing them onto the elastic in the following pattern two main color and one accent color. Repeat two main beads one accent bead until the end. Adjust the pattern by sets of three to increase or decrease the size.
Can you use seed beads for stitch?
If you have access to them, Miyuki round seed beads are excellent for . Alternatively, 1.5 mm cube beads are just the right size, and their boxy shape makes stitch a little easier. They arent always as uniform as round seed beads, so you might need to cull them as you work.
Is even or odd easier?
Odd count is more challenging than even count because it requires an extra step when you turn your thread around to start your next row on one side of your beadwork. So beginners should start with even count stitch before attempting the odd count.
How do you increase and decrease stitch?
Step-by-Step Tutorial Begin by stitching a base row of stitch using your desired number of beads. To increase, pick up two beads instead of one as you work the next row. Continue stitching the row as normal, stepping up at the end. To decrease, skip a bead as you work the next row.
How to make increases and decreases in brick stitch?
0:12 1:20 Then up through the beads in the third row above. Down through the row to the left. And up throughMoreThen up through the beads in the third row above. Down through the row to the left. And up through the last row. Now your thread is in the working. Position.
How to do a diagonal stitch?
0:31 2:40 Through. And theres your diagonal stitch to create the next one you put your needle back in upMoreThrough. And theres your diagonal stitch to create the next one you put your needle back in up through the other end pull your needle. And theres your diagonal stitch.
Related links
Free Bead Crochet Rope Patterns
Bead crochet is a technique where beads are incorporated directly into the crochet stitches, resulting in textured, decorative cords and ropes. Free bead
On the back, draw a diagonal line from corner to corner perpendicular to the previous stitching lines. Position the #57 foot as before, and stitch on each
Cookie consent notice
This site uses cookies to enhance site navigation and personalize your experience.
By using this site you agree to our use of cookies as described in our Privacy Notice.
You can modify your selections by visiting our Cookie and Advertising Notice.