Get the up-to-date Fill in forms automatically - Computer - Google Chrome Help 2024 now

Get Form
Fill in forms automatically - Computer - Google Chrome Help Preview on Page 1

Here's how it works

01. Edit your form online
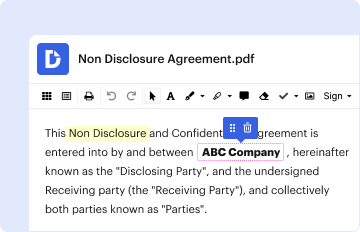
Type text, add images, blackout confidential details, add comments, highlights and more.
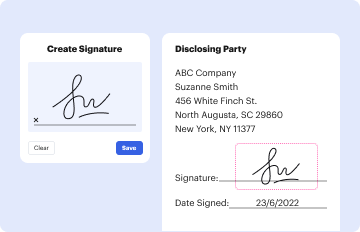
02. Sign it in a few clicks
Draw your signature, type it, upload its image, or use your mobile device as a signature pad.
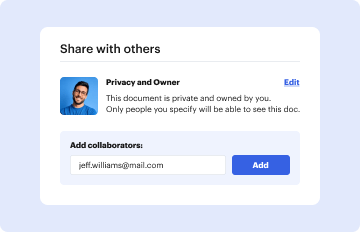
03. Share your form with others
Send it via email, link, or fax. You can also download it, export it or print it out.

How to quickly redact Fill in forms automatically - Computer - Google Chrome Help online

Form edit decoration
9.5
Ease of Setup
DocHub User Ratings on G2
9.0
Ease of Use
DocHub User Ratings on G2

Dochub is the best editor for modifying your documents online. Adhere to this simple instruction to edit Fill in forms automatically - Computer - Google Chrome Help in PDF format online at no cost:

  1. Sign up and log in. Register for a free account, set a strong password, and proceed with email verification to start managing your templates.
  2. Upload a document. Click on New Document and choose the form importing option: upload Fill in forms automatically - Computer - Google Chrome Help from your device, the cloud, or a secure link.
  3. Make adjustments to the sample. Use the top and left-side panel tools to modify Fill in forms automatically - Computer - Google Chrome Help. Add and customize text, pictures, and fillable areas, whiteout unnecessary details, highlight the significant ones, and comment on your updates.
  4. Get your documentation done. Send the form to other parties via email, create a link for faster file sharing, export the sample to the cloud, or save it on your device in the current version or with Audit Trail included.

Try all the benefits of our editor today!

be ready to get more

Complete this form in 5 minutes or less

Get form

Got questions?

We have answers to the most popular questions from our customers. If you can't find an answer to your question, please contact us.
Contact us
2:00 10:49 Tech Tip # 86 - Create a google form that automatically fills - YouTube YouTube Start of suggested clip End of suggested clip So for us its tech tip 86. And were going to go ahead and click on select. Were going to selectMoreSo for us its tech tip 86. And were going to go ahead and click on select. Were going to select the sheet that contains our form choices uh so were gonna go ahead and uh it is on choices because
Chrome (Android) Open up the Chrome app on your Android device. At the top right, tap the More button (three dots), and select Settings. Tap Autofill and Payments. Tap either Address and more or Payment Methods. Edit both Address and more or Payment Methods to reflect your new name and information.
Google Chrome Instructions Click the Chrome menu icon. (Three dots at top right of screen.) Click on Settings. In the Autofill section, expand the area for which you wish to disable Autofill. Toggle the setting OFF if it is on. The system will automatically save your settings.
With Google Chrome open, select the three dots found at the top right of the Chrome window for customize and control Google Chrome. Choose Settings from the dropdown menu. On the left side of the Settings window, choose Autofill.
Google Chrome Instructions Click the Chrome menu icon. (Three dots at top right of screen.) Click on Settings. In the Autofill section, expand the area for which you wish to disable Autofill. Toggle the setting OFF if it is on. The system will automatically save your settings.
be ready to get more

Complete this form in 5 minutes or less

Get form

People also ask

How do you delete autofill data of other fields??? Go to the affected website. Start typing the suggestion you want to remove in the input area. Use your keyboard down arrow to highlight the suggestion. Remove the suggestion: Windows: Press Shift + Delete. Mac: Press Shift + fn + Delete.
Manage Always verify when using autofill setting On your Android phone or tablet, open Chrome . To the right of the address bar, tap More. Settings. Tap Payment methods. Next to Always verify when using autofill, turn on or off.
Clear all autofill entries directly via Chrome settings in your toolbar Open Chrome. Click the three dot symbol More Tools Clear browsing data Click the Advanced tab in the new window, and select All time from the drop down. Check the Autofill form data box. Click the Clear data button.

Related links