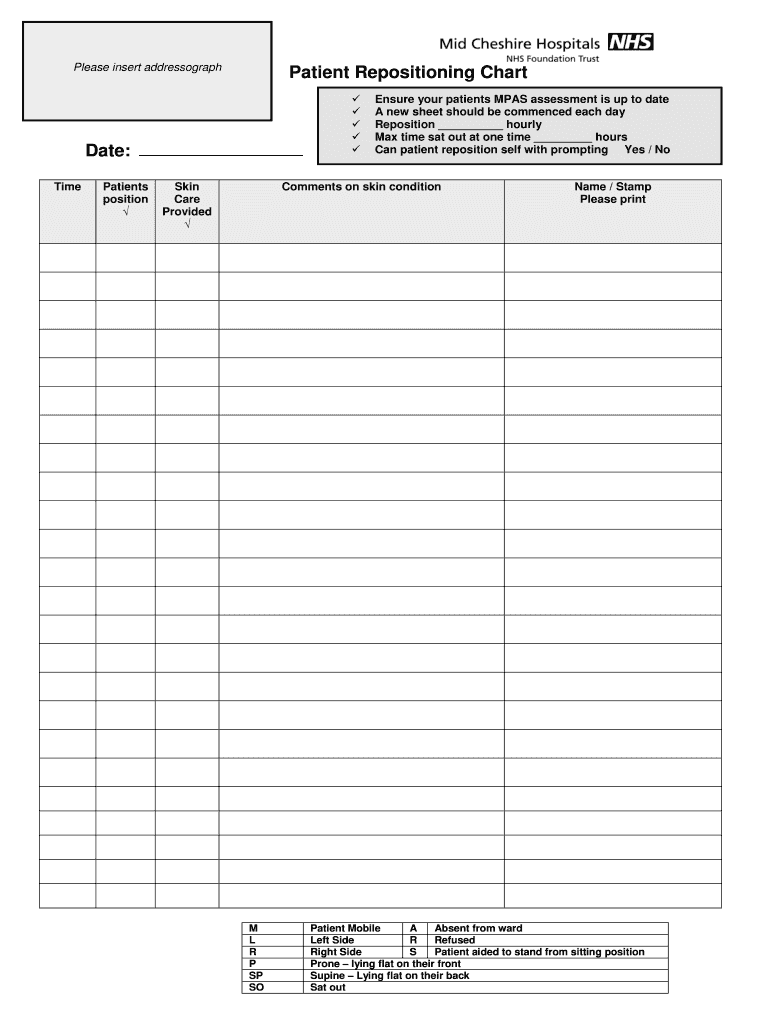


Definition of the Patient Repositioning Chart
A Patient Repositioning Chart is a specialized document used in healthcare to track and manage the repositioning of patients, particularly those with limited mobility or at risk for pressure sores. The chart aids caregivers in documenting essential details about a patient’s positioning schedule, skin care interventions, and overall skin condition. Its primary goal is to ensure that patients receive regular repositioning to prevent complications like pressure ulcers, which can arise from prolonged periods of immobility.
Key Components of the Patient Repositioning Chart
- Date and Time: Essential fields for noting specific times of patient repositioning.
- Patient Position: This may include various positions such as supine, lateral, prone, or sitting, allowing healthcare providers to maintain a systematic rotation of the patient’s position.
- Skin Care Provided: Documentation of any treatments or interventions applied to the skin, including lotions, barrier creams, or other protective measures.
- Comments on Skin Condition: Space for caregivers to note observations related to the patient’s skin health, such as redness, irritation, or any other concerns.
The use of this chart is typically initiated upon a patient’s admission, and it should be routinely updated as part of daily care practices.
How to Use the Patient Repositioning Chart
Using a Patient Repositioning Chart effectively requires a systematic approach to ensure comprehensive patient care. Here are the steps involved in using the chart:
-
Initial Setup:
- Input the patient’s name, admission date, and any relevant medical history that may impact their positioning needs.
-
Establish a Repositioning Schedule:
- Create a documented schedule based on the patient’s needs, often recommending repositioning every two hours. Adhere to this schedule to ensure consistent care.
-
Document Repositioning:
- After each repositioning, record the time, the new position, and skin care measures taken. This documentation is crucial for maintaining accurate health records.
-
Monitor and Review:
- Regularly review the chart for any changes in the patient's skin condition and adjust the repositioning schedule or care strategies accordingly.
-
Collaboration:
- Share the documented chart with the healthcare team to ensure continuity of care and gather feedback on any observed skin issues or required adjustments.
By adhering to this format, caregivers can ensure that patients receive thorough and consistent care while minimizing the risk of pressure sores.
Steps to Complete the Patient Repositioning Chart
Completing the Patient Repositioning Chart is a straightforward process that requires attention to detail and consistent updates. Here are the steps involved:
-
Start with Patient Identification:
- Fill in patient demographics, including full name, room number, and medical record number, to avoid any confusion or errors.
-
Daily Assessment:
- Conduct a skin assessment at the beginning of each shift to document the patient's current skin condition.
-
Reposition According to Schedule:
- Implement the established repositioning schedule. For example, if a patient is to be repositioned every two hours, ensure that there is a log of each repositioning event.
-
Document Skin Care Applications:
- Record any skin care interventions applied after each repositioning, such as moisturizing or cleansing to protect skin integrity.
-
End-of-Day Review:
- At the end of each shift, review the chart and verify that all entries are accurate and complete. Ensure that comments related to skin condition are comprehensive and documented.
By following these steps, caregivers can provide consistent care while maintaining a clear record that can be easily reviewed by healthcare team members.
Importance of the Patient Repositioning Chart
The significance of using a Patient Repositioning Chart cannot be overstated as it plays a vital role in patient care:
- Prevention of Pressure Ulcers: Regular repositioning drastically reduces the risk of developing pressure sores, an essential aspect of patient safety.
- Documentation for Compliance: It provides a legal record that demonstrates adherence to established care protocols, which is critical for regulatory compliance.
- Enhanced Communication: A well-maintained positioning chart creates a basis for effective communication among healthcare providers, improving team collaboration and patient outcomes.
The chart also serves as a valuable teaching tool for new staff, demonstrating proper patient care techniques and reinforcing the importance of consistent monitoring.
Key Elements of the Patient Repositioning Chart
Understanding the crucial components of the Patient Repositioning Chart is essential to maximize its utility in a healthcare setting. This chart typically comprises the following elements:
- Patient Information: Includes key personal and medical details that guide care decisions.
- Positioning Schedule: A pre-defined schedule indicating when and how often the patient should be repositioned.
- Skin Care Procedures: Documented interventions that detail the skin care routine implemented during each repositioning session.
- Observation Notes: A section dedicated to recording caregiver observations regarding any changes in skin condition or patient comfort levels.
- Signatures of Caregivers: Signature lines for staff completing the chart facilitate accountability and ensure proper documentation practices.
Incorporating these key elements guarantees systematic care and enhances the overall health and safety of patients requiring repositioning.
Examples of Using the Patient Repositioning Chart
The application of the Patient Repositioning Chart can vary based on the patient's condition. Here are some practical examples illustrating its use in a clinical setting:
-
Post-Operative Patient: After surgery, a patient may require repositioning every two hours to mitigate the risk of blood clots and pressure sores. Caregivers can utilize the chart to track each repositioning session and document any skin observations, ensuring proactive skin care measures.
-
Long-Term Care Resident: For residents in a long-term care facility, the Patient Repositioning Chart helps staff track positioning over weeks or months. Weekly summaries can be utilized to evaluate the effectiveness of the repositioning schedule in preventing pressure sores during routine care.
-
Rehabilitation Patient: In a rehabilitation setting, physical and occupational therapists can reference the chart to coordinate care strategies with nursing staff. This integrated approach can improve the overall recovery trajectory for patients as their needs change.
These examples underscore the versatility and necessity of the Patient Repositioning Chart in effective patient care management across various healthcare environments.