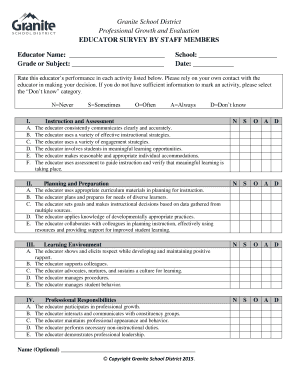
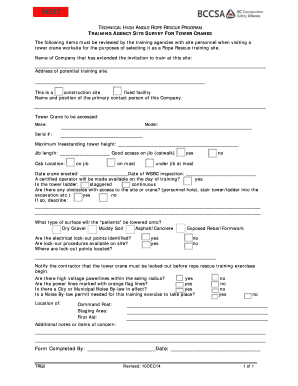
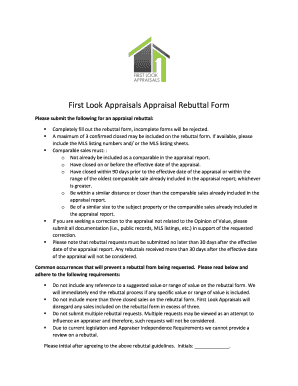
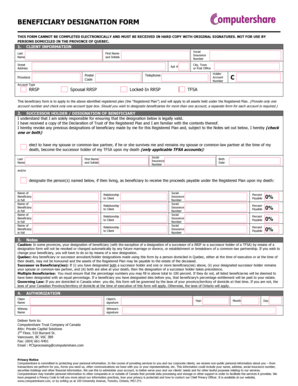
Understanding "Lesson 1: PowerPoint Basics"
"Lesson 1: PowerPoint Basics" typically introduces users to the foundational aspects of Microsoft PowerPoint. This content is tailored for individuals looking to learn how to navigate and effectively utilize the application for creating presentations. It covers essential skills such as starting the software, exploring various views, and managing presentation elements.
Step-by-Step Instructions for Lesson 1: PowerPoint Basics
-
Starting PowerPoint: Begin by launching Microsoft PowerPoint. Locate the program through your computer's Start menu or search function.
-
Exploring the Interface: Familiarize yourself with the PowerPoint interface, which includes ribbons, slides pane, and notes section.
-
Creating a New Presentation: Choose 'New' to start a blank presentation or select a template for structured design.
-
Slide Management: Learn to add, delete, and reorder slides within your presentation.
-
Adding Content: Insert text, images, and other multimedia elements to enhance your slides.
-
Utilizing Slide Views: Switch between Normal View, Slide Sorter, and Slide Show to manage layout, order, and presentation flow.
-
Saving and Printing: Save your work frequently using 'Save As.' Once complete, print your presentation or save it as a PDF for distribution.
Objectives of Lesson 1: PowerPoint Basics
- To equip users with the ability to create a visually appealing and coherent presentation.
- To ensure an understanding of how to navigate PowerPoint’s interface and features effectively.
- To encourage exploration of PowerPoint’s diverse templates and tools.
Potential Users of Lesson 1: PowerPoint Basics
PowerPoint Basics is beneficial for a wide range of individuals from students to business professionals and educators. Each group can leverage PowerPoint to present information clearly and effectively across various settings.
Terminology Important for Lesson 1: PowerPoint Basics
- Slide: A single page in a presentation.
- Template: Pre-designed slide layouts provided by PowerPoint.
- Animation: Effects applied to slide elements for dynamic transition.
Key Elements of Lesson 1: PowerPoint Basics
Understanding key elements such as slide formats, design themes, and multimedia integration is crucial. These elements form the backbone of any engaging presentation and allow for creative expression while conveying information succinctly.
Real-World Scenarios Using PowerPoint Basics
- Academic Presentations: Students use PowerPoint to present projects, theses, or research findings visually.
- Business Meetings: Professionals deliver product pitches, financial reviews, and strategic plans with slideshows.
- Educational Workshops: Instructors employ PowerPoint to organize lesson content and engage with the audience.
Examples of Utilizing Lesson 1: PowerPoint Basics
- Creating Corporate Reports: Highlight quarterly performance with charts and bullet points.
- Designing Educational Content: Use animations to illustrate scientific processes or historical timelines.
Benefits of PowerPoint Basics for Different Business Types
Businesses across various industries utilize PowerPoint for distinct needs. From start-ups to large corporations, the software's versatility allows for tailored presentations that meet specific business goals. For instance, a marketing agency might use advanced graphic tools to showcase advertising campaigns.
Exploring Variants and Versions of Lesson 1: PowerPoint Basics
While the focus is on Microsoft PowerPoint 2003, later versions offer enhanced features such as cloud integration and collaborative editing. Exploring these versions can offer more utility and ease of use in today's digital environment.
Legal Considerations for Using PowerPoint
Ensure that copyrighted images and content are legally permissible within your presentation to avoid potential legal issues. Use materials under fair use guidelines or seek proper licensing if necessary.
These sections provide a comprehensive understanding of PowerPoint Basics, offering practical insights into its usage, benefits, and applications across different scenarios.