Type text, add images, blackout confidential details, add comments, highlights and more.
02. Sign it in a few clicks
Draw your signature, type it, upload its image, or use your mobile device as a signature pad.
03. Share your form with others
Send blank audiogram pdf via email, link, or fax. You can also download it, export it or print it out.
How to use or fill out teaching audiogram with our platform
Ease of Setup
DocHub User Ratings on G2
Ease of Use
DocHub User Ratings on G2
Click ‘Get Form’ to open the teaching audiogram in the editor.
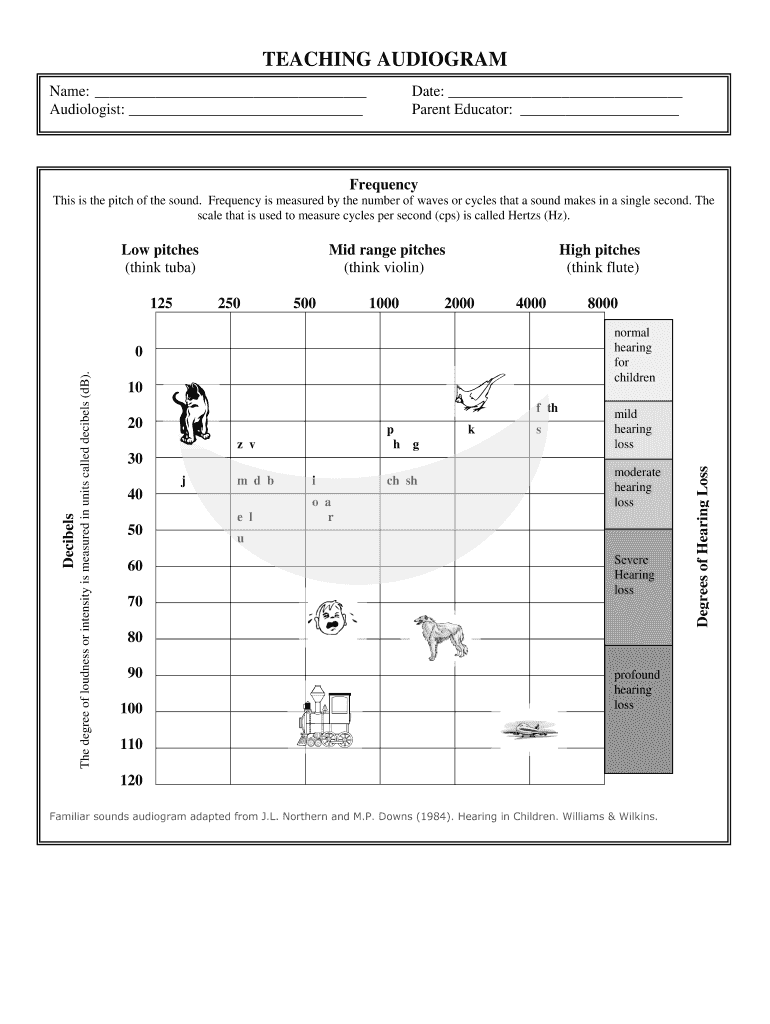
Begin by entering the 'Name' of the child in the designated field. This personalizes the audiogram and ensures accurate record-keeping.
Next, fill in the 'Audiologist' field with the name of the professional conducting the assessment. This is crucial for accountability and follow-up.
Enter the 'Date' of assessment to document when this audiogram was completed, which helps track progress over time.
In the 'Parent Educator' section, input the name of the parent or educator involved. This fosters collaboration between home and educational settings.
For frequency measurements, mark appropriate levels on a scale from low pitches (125 Hz) to high pitches (8000 Hz). Use checkboxes or input fields as provided.
Indicate any degrees of hearing loss by selecting corresponding decibel levels. This section is vital for understanding a child's hearing capabilities.
Start using our platform today to easily complete your teaching audiogram online for free!
Rule 2. Masking is needed at any frequency where the not-masked bone conduction threshold is better than the air conduction threshold of either ear by 10 dB or more.
How to read an audiogram for kids?
The quietest sounds a person can hearthresholdsare measured across a broad range of pitches. The numbers on the top of the audiogram represent pitch. When reading them from left to right, pitch changes from low to high (bass to treble). The numbers running down the side of the audiogram represent loudness level.
What are the criteria for masking in audiology?
Masking is needed when the difference between air conduction thresholds between ears is 40 dB or more when using supra-aural headphones or 55 dB or more when using insert earphones. This relates to the use of clinical masking in determining the individual loss in each ear.
What is rule 3 masking?
Rule three. Rule three of masking aims to find the true AC thresholds when a conductive hearing loss exists in the opposite ear. As there is a conductive loss in the opposite ear rule 1 doesnt apply, but as the cross hearing pathway from the AC is to the opposite cochlea, masking is still needed.
How do you perform an audiogram?
Audiogram symbols and their meaning X or a square (possibly in blue) is the result from your left ear measured with headphones (air conduction). S means the information is not ear-specific. or [ is the result from your right ear measured with bone conduction.
Formula: Initial Masking Level (IML) = SRT of the non-test ear (SRTNTE) + 10dB. This 10 dB safety factor ensures that the masking noise is sufficiently above the threshold of the non-test ear to prevent it from detecting the test stimulus. How is Speech Recognition Test Performed? Starting @ the PTA level plus 20db
What is rule 3 of masking audiology?
Rule three of masking aims to find the true AC thresholds when a conductive hearing loss exists in the opposite ear.
free printable blank audiogram template
The New Hearing Innovations at AAA 2013
Starkeys best-fit tinnitus algorithm first sets the tinnitus stimulus according to the patients audiogram, then allows for flexible adjustments in 16 bandsRead more
How to Read an Audiogram - Iowa Head and Neck Protocols
May 3, 2017 Audiograms are used to diagnose and monitor hearing loss. Audiograms are created by plotting the thresholds at which a patient can hear variousRead more
Cookie consent notice
This site uses cookies to enhance site navigation and personalize your experience.
By using this site you agree to our use of cookies as described in our Privacy Notice.
You can modify your selections by visiting our Cookie and Advertising Notice.