Get the up-to-date If you need more room than is provided for in a panel, and your software allows, you can expand any 2025 now

Get Form
If you need more room than is provided for in a panel, and your software allows, you can expand any  Preview on Page 1

Here's how it works

01. Edit your form online
Type text, add images, blackout confidential details, add comments, highlights and more.
02. Sign it in a few clicks
Draw your signature, type it, upload its image, or use your mobile device as a signature pad.
03. Share your form with others
Send it via email, link, or fax. You can also download it, export it or print it out.

How to modify If you need more room than is provided for in a panel, and your software allows, you can expand any online

Form edit decoration
9.5
Ease of Setup
DocHub User Ratings on G2
9.0
Ease of Use
DocHub User Ratings on G2

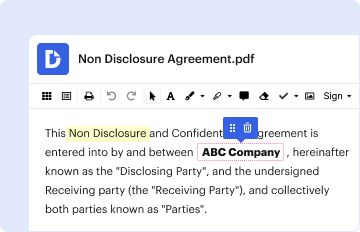
With DocHub, making changes to your paperwork takes just a few simple clicks. Follow these quick steps to modify the PDF If you need more room than is provided for in a panel, and your software allows, you can expand any online free of charge:

  1. Register and log in to your account. Log in to the editor with your credentials or click on Create free account to examine the tool’s features.
  2. Add the If you need more room than is provided for in a panel, and your software allows, you can expand any for redacting. Click on the New Document option above, then drag and drop the file to the upload area, import it from the cloud, or using a link.
  3. Adjust your document. Make any changes required: insert text and photos to your If you need more room than is provided for in a panel, and your software allows, you can expand any , highlight information that matters, erase sections of content and replace them with new ones, and add icons, checkmarks, and areas for filling out.
  4. Complete redacting the form. Save the updated document on your device, export it to the cloud, print it right from the editor, or share it with all the people involved.

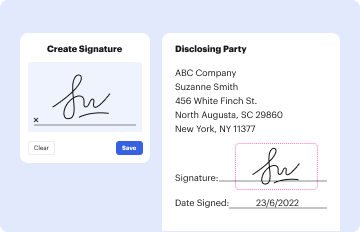
Our editor is very intuitive and effective. Try it now!

be ready to get more

Complete this form in 5 minutes or less

Get form

Got questions?

We have answers to the most popular questions from our customers. If you can't find an answer to your question, please contact us.
Contact us
The Source and Program Monitors in Premiere Pro let you view video clips and edit video sequences. Learn about the customizable controls and display modes in the monitors. The Source Monitor plays back individual clips. In the Source Monitor, you prepare clips that you want to add to a sequence.
With the Project panel selected press the tilde (~) key on your keyboard. The tilde (~) key acts as a minimize/maximize toggle for whichever panel is currently active.
0:19 1:12 Or accent key and it will expand. It or reduce it. There you go quick tip for you.MoreOr accent key and it will expand. It or reduce it. There you go quick tip for you.
The Source Monitor is where well preview our footage and trim the unwanted bits of our video to prepare it for adding it into the timeline.
0:13 7:06 Source Panel Overview For Beginners In Premiere Pro - YouTube YouTube Start of suggested clip End of suggested clip So the source panels This top left panel youll see thats highlighted here in blue the purpose ofMoreSo the source panels This top left panel youll see thats highlighted here in blue the purpose of the source panel is when you have a larger clip. And you want to sort out specific sections. And you
be ready to get more

Complete this form in 5 minutes or less

Get form

People also ask

0:00 0:14 Full screen the keyboard shortcut to do that is tilde just click on the panel you want to make fullMoreFull screen the keyboard shortcut to do that is tilde just click on the panel you want to make full screen hit the tilde.
Premiere Pro. In addition to applying effects to track items or clips in a sequence, Premiere Pro lets you apply effects to source clips (previously known as master clips). A source clip can be described as a parent clip, and all the sequence clips created from the source clip as child clips.
The main purpose of the Source Monitor is to allow you to view your clips at full resolution and establish In and Out points. That description makes the Source Monitor sound simple, and it makes its purpose seem minimal. After all, you can set In and Out points in the Project panel.

Related links