





Definition and Importance of a Lead Apron Inspection Checklist
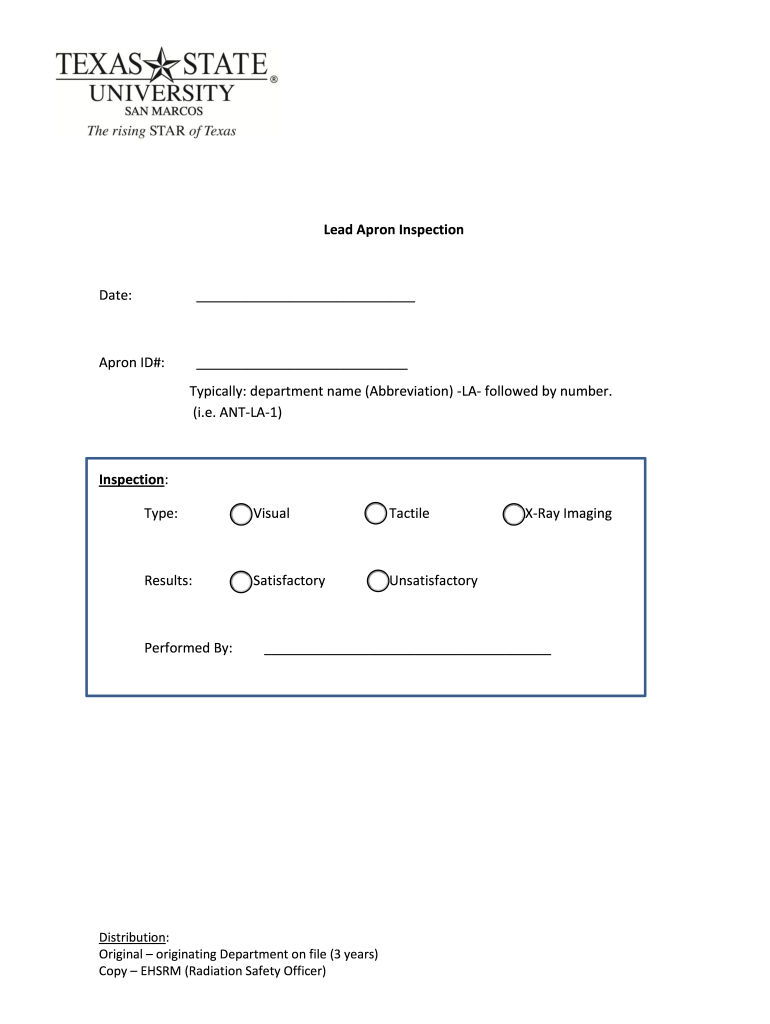
A lead apron inspection checklist is a structured guide used to assess the condition and safety of lead aprons, which are essential protective gear in environments where personnel are exposed to radiation, such as medical facilities and laboratories. These checklists outline the steps required to perform visual and tactile inspections, ensuring that lead aprons meet safety standards and remain effective in protecting users from harmful radiation exposure. It is crucial for maintaining workplace safety and compliance with health regulations.
Purpose of the Lead Apron Inspection Checklist
The primary purpose of this checklist is to ensure the ongoing safety and efficacy of lead aprons. Regular inspections are vital due to the potential for wear and tear that can compromise their protective capabilities. The checklist aids in identifying defects, such as rips, tears, or any damage that may not be immediately visible. Ensuring that all aprons are in satisfactory condition not only protects staff health but also maintains compliance with safety protocols mandated by regulatory bodies.
How to Use the Lead Apron Inspection Checklist
Using the lead apron inspection checklist effectively involves several key steps.
- Gather Required Materials: Start by collecting all lead aprons that need inspection along with the checklist.
- Perform Visual Inspection:
- Examine each apron for obvious signs of wear, such as holes, fraying, or discoloration.
- Check for the integrity of straps and fastenings.
- Conduct Tactile Inspection:
- Feel for any signs of damage that may not be visible, such as stiffness or irregularities in the lead.
- Document Findings:
- Record each apron’s condition in the checklist and mark whether it is satisfactory or unsatisfactory.
- Note any specific defects that require attention or repair.
- Provide Follow-Up Actions:
- For aprons deemed unsatisfactory, outline a plan for repair or replacement.
This systematic approach not only allows for thorough inspections but also aids in maintaining accurate records.
Steps to Complete the Lead Apron Inspection Checklist
Completing the lead apron inspection involves a detailed, methodical process.
Step-by-Step Completion Process
- Preparation: Ensure that the inspection area is clean and well-lit.
- Visual Inspection:
- Check each apron for visible damage or wear, ensuring to focus on areas prone to stress.
- Look for compliance labels or expiration dates to ensure the aprons are within their operational lifespan.
- Tactile Inspection:
- Run your hands over the surface to detect any unevenness or stiffness that may indicate potential issues.
- Record Findings: Note each apron’s condition and any repairs needed on the lead apron inspection log.
- Finalize Documentation: Ensure all information is clear and filed according to the organization’s protocols.
This detailed inspection process helps maintain an accurate log of the apron’s condition over time, allowing for proactive management of equipment safety.
Key Elements of the Lead Apron Inspection Checklist
A comprehensive lead apron inspection checklist includes several critical elements that ensure effective inspections.
- Identification Details: Include a section for the apron’s identification such as serial number, model, and owner.
- Types of Inspections: Clearly outline visual and tactile inspection steps to differentiate between initial and thorough inspections.
- Results Category: Designate sections for recording acceptable and unacceptable findings along with descriptions of any defects.
- Personnel Responsible: Indicate who conducted the inspection and who is accountable for follow-up actions.
- Distribution Protocol: Establish guidelines for how inspection records are shared and stored for future reference.
Incorporating these elements helps streamline the inspection process and ensures accountability for safety compliance.
Legal Use of the Lead Apron Inspection Checklist
Understanding the legal context of lead apron inspections is essential for compliance.
Legal Requirements and Regulations
- OSHA Standards: Ensure that inspections meet Occupational Safety and Health Administration (OSHA) standards for radiation safety. These regulations require regular inspections and documentation.
- State-Specific Rules: Recognize that different states may have additional requirements for radiation safety equipment. It is essential to familiarize yourself with local laws applicable to lead apron use within health and safety protocols.
- Documentation: Maintain records of inspections as legal evidence of compliance, ensuring they are easily accessible in case of audits or inspections.
Fulfilling these legal requirements shields organizations from potential liabilities while reinforcing their commitment to employee safety.
Examples of Using the Lead Apron Inspection Checklist
The lead apron inspection checklist is utilized in various scenarios within healthcare and laboratory settings.
Practical Scenarios
- Hospital Radiology Department:
- Routine inspections are conducted monthly to ensure all aprons are free of defects, motivating staff to report any damage early.
- Dental Clinics:
- Dental professionals use the checklist to inspect lead aprons before each patient interaction, ensuring the safety of both staff and patients.
- Nuclear Medicine Facilities:
- A lead apron inspection entails a quarterly schedule, integrating inspections with staff training sessions to reinforce safety practices.
These examples underscore the versatility and importance of the checklist across different healthcare contexts, demonstrating its role in safeguarding health professionals and patients alike.