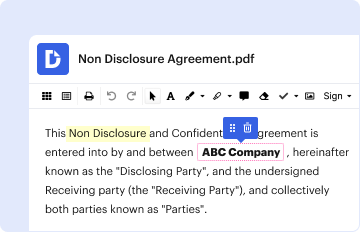
Type text, add images, blackout confidential details, add comments, highlights and more.
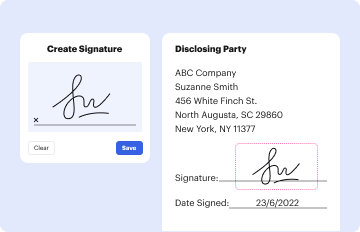
02. Sign it in a few clicks
Draw your signature, type it, upload its image, or use your mobile device as a signature pad.
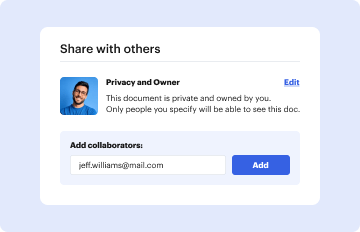
03. Share your form with others
Send it via email, link, or fax. You can also download it, export it or print it out.
How to use or fill out POS (Page 1) with our platform
Ease of Setup
DocHub User Ratings on G2
Ease of Use
DocHub User Ratings on G2
Click ‘Get Form’ to open the POS registration form in the editor.
Begin by entering the 'Complete Name of School or School District' in the designated field. Ensure that this information is accurate for proper identification.
Fill in the 'School Address' section, including street, city, state, and zip code. This helps in associating your rewards with the correct location.
Provide your personal details by entering your 'First/Last Name', 'Title/Function', 'E-mail Address', and 'Phone Number'. This information is crucial for communication regarding your rewards.
Indicate the name of any distributor used for placing Smucker’s orders. This helps track purchases effectively.
Select whether you are a new or existing customer by checking the appropriate box. If applicable, circle any additional flavors you plan to purchase.
Once all fields are completed, submit the form via fax, email, or mail as instructed at the bottom of the page.
Start using our platform today to streamline your document editing and form completion process for free!
Administered by Aetna, the Point-of-Service (POS) II plan doesnt require a Primary Care Provider () or referrals, even when using in-network providers. You can go to any provider, but your out-of-pocket costs are based on the type of provider you use: In-Network Providers.
What is an example of a POS?
A POS, or point of sale, enables merchants to process payments and log transactions. It is a computer-based cash register with software capable of tallying up orders, taking payments, monitoring inventory and buying trends, creating invoices, and collecting marketing data.
What is a POS page?
Point-of-sale (POS) systems have evolved from cash registers to modern hubs that manage sales, customer experience, promotional offers, and operational processes.
Related Searches
Pos page 1 downloadPos page 1 androidPos page 1 appPos page 1 freePos page 1 free downloadFree POS software for PCLoyverse POS appPOS system for small business free
UCF Electrical Engineering PhD Program of Study (POS)
Page 1. UCF Electrical Engineering PhD Program of Study (POS). Catalog Year 2019-2020. Page 1. For a complete list of suggested doctoral, specialization courses
Cookie consent notice
This site uses cookies to enhance site navigation and personalize your experience.
By using this site you agree to our use of cookies as described in our Privacy Notice.
You can modify your selections by visiting our Cookie and Advertising Notice.