Type text, add images, blackout confidential details, add comments, highlights and more.
02. Sign it in a few clicks
Draw your signature, type it, upload its image, or use your mobile device as a signature pad.
03. Share your form with others
Send it via email, link, or fax. You can also download it, export it or print it out.
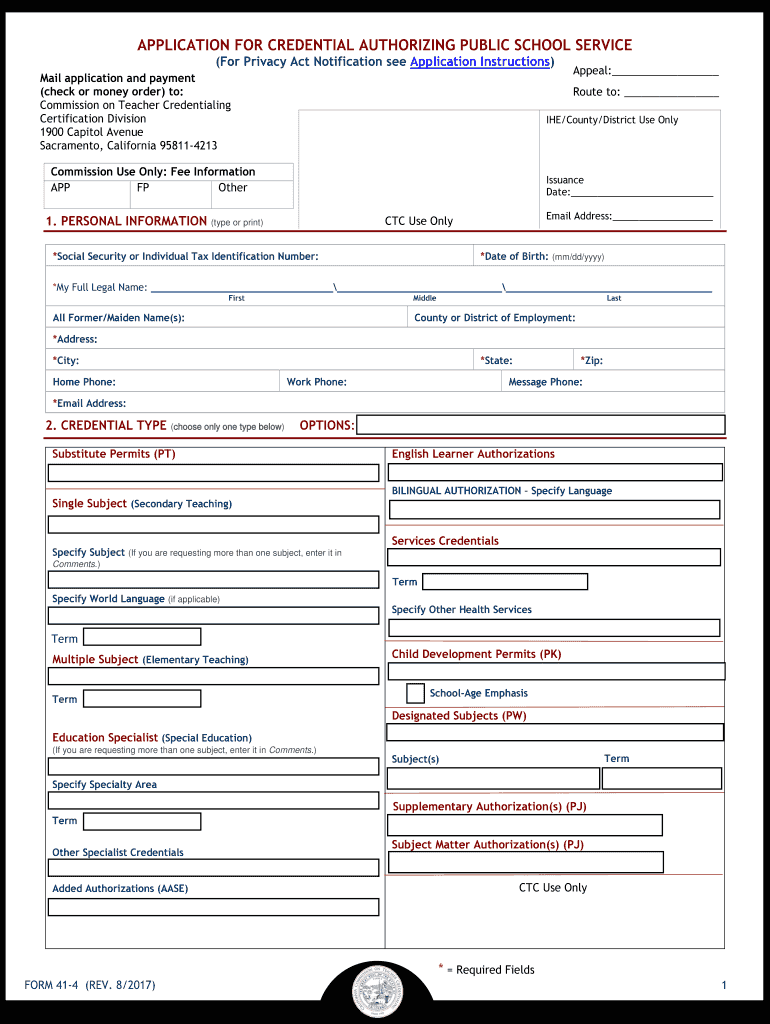
How to use or fill out authorizing form 2017-2019 with our platform
Ease of Setup
DocHub User Ratings on G2
Ease of Use
DocHub User Ratings on G2
Click ‘Get Form’ to open the authorizing form 2017-2019 in the editor.
Begin by filling out the 'Personal Information' section. Enter your email address, Social Security or Individual Tax Identification Number, date of birth, and full legal name. Ensure all required fields marked with an asterisk (*) are completed.
In the 'Credential Type' section, select only one type of credential you are applying for. If applicable, specify any additional subjects or authorizations in the comments field.
Complete the 'Child Development Permit Renewal Self-Verification' section by indicating the number of professional growth hours completed and providing your Professional Growth Advisor's details.
Answer all questions in the 'Professional Fitness Questions' section honestly. If you answer 'Yes' to any question, be prepared to complete a corresponding explanation form.
Fill out the 'Employing Agency Information' if required for your credential type. Ensure that all information is accurate and complete before submission.
Finally, review your application for completeness and sign under the 'Oath and Affidavit' section before submitting it along with payment.
Start using our platform today to easily fill out your authorizing form for free!
Fill out authorizing form 2017-2019 online It's free
We've got more versions of the authorizing form 2017-2019 form. Select the right authorizing form 2017-2019 version from the list and start editing it straight away!
Simple authorization form 2017 2019Free authorization form 2017 2019Authorization form 2017 2019 pdfTexas Standard Prior authorization form pdfTexas Standard Authorization formTexas Medicaid Authorization formTexas standard prior authorization form Fax numberAuthorization form Template
Security and compliance
At DocHub, your data security is our priority. We follow HIPAA, SOC2, GDPR, and other standards, so you can work on your documents with confidence.
Title of Employer or Authorized Representative. Last Name of Employer or Authorized Representative First Name of Employer or Authorized Representative.Read more
For instance, no internal movement authorization form is signed each time an item is moved from its assigned location and ownership to another place orRead more
2017-2019 NSFG - Public-Use Data Files, Codebooks and
[PDF 294 KB] Interview Authorization Letter [PDF 44 KB] Adult Consent Form [PDF 43 KB] Minor Assent Form [PDF 49 KB] Parent Permission Form [PDFRead more
Cookie consent notice
This site uses cookies to enhance site navigation and personalize your experience.
By using this site you agree to our use of cookies as described in our Privacy Notice.
You can modify your selections by visiting our Cookie and Advertising Notice.