Insert sign in ps smoothly

Aug 6th, 2022
Icon decoration
0
forms filled out
Icon decoration
0
forms signed
Icon decoration
0
forms sent
Service screenshot
01. Upload a document from your computer or cloud storage.
Service screenshot
02. Add text, images, drawings, shapes, and more.
Service screenshot
03. Sign your document online in a few clicks.
Service screenshot
04. Send, export, fax, download, or print out your document.

How to insert sign in ps

Form edit decoration

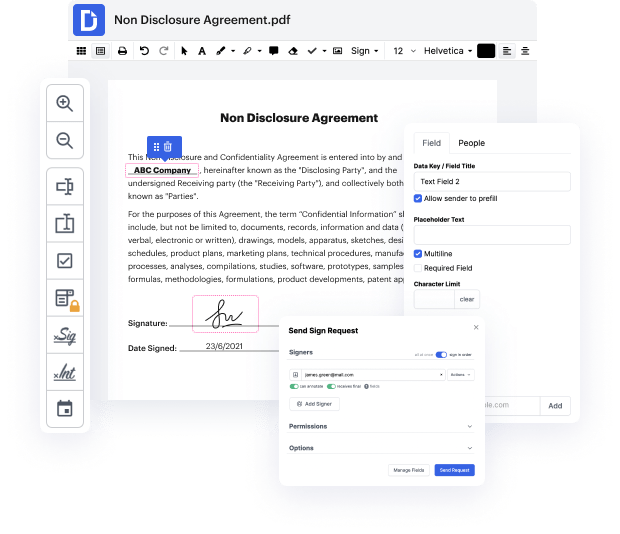
When your day-to-day work consists of lots of document editing, you realize that every file format requires its own approach and sometimes particular software. Handling a seemingly simple ps file can often grind the whole process to a halt, especially when you are attempting to edit with insufficient software. To prevent this kind of troubles, find an editor that can cover your requirements regardless of the file extension and insert sign in ps without roadblocks.

With DocHub, you are going to work with an editing multitool for any occasion or file type. Reduce the time you used to devote to navigating your old software’s functionality and learn from our intuitive interface while you do the work. DocHub is a streamlined online editing platform that covers all of your file processing requirements for any file, such as ps. Open it and go straight to efficiency; no prior training or reading instructions is needed to enjoy the benefits DocHub brings to document management processing. Begin with taking a few moments to register your account now.

Take these steps to insert sign in ps

  1. Go to the DocHub webpage and hit the Create free account button.
  2. Proceed to signup and enter your current email address to create your account. To fast-track your registration, simply link your Gmail account.
  3. Once your registration is finished, proceed to the Dashboard. Add the ps to start editing online.
  4. Open your document and use the toolbar to add all desired modifications.
  5. After you’ve finished editing, save your file: download it back on your device, keep it in your account, or send it to the chosen recipients directly from the editor tab.

See improvements within your document processing right after you open your DocHub account. Save your time on editing with our one solution that can help you become more efficient with any file format with which you need to work.

PDF editing simplified with DocHub

Seamless PDF editing
Editing a PDF is as simple as working in a Word document. You can add text, drawings, highlights, and redact or annotate your document without affecting its quality. No rasterized text or removed fields. Use an online PDF editor to get your perfect document in minutes.
Smooth teamwork
Collaborate on documents with your team using a desktop or mobile device. Let others view, edit, comment on, and sign your documents online. You can also make your form public and share its URL anywhere.
Automatic saving
Every change you make in a document is automatically saved to the cloud and synchronized across all devices in real-time. No need to send new versions of a document or worry about losing information.
Google integrations
DocHub integrates with Google Workspace so you can import, edit, and sign your documents directly from your Gmail, Google Drive, and Dropbox. When finished, export documents to Google Drive or import your Google Address Book and share the document with your contacts.
Powerful PDF tools on your mobile device
Keep your work flowing even when you're away from your computer. DocHub works on mobile just as easily as it does on desktop. Edit, annotate, and sign documents from the convenience of your smartphone or tablet. No need to install the app.
Secure document sharing and storage
Instantly share, email, and fax documents in a secure and compliant way. Set a password, place your documents in encrypted folders, and enable recipient authentication to control who accesses your documents. When completed, keep your documents secure in the cloud.

Drive efficiency with the DocHub add-on for Google Workspace

Access documents and edit, sign, and share them straight from your favorite Google Apps.
Install now

How to Insert sign in ps

4.9 out of 5
19 votes

hi friends welcome back to my other photoshop tutorial in this tutorial i am going to show you how to create transparent signature in photoshop before begin dont forget to subscribe my channel below and hit bell icon to never miss the update lets get started first of all double click and select this signature image and hit open cool double click on this lock icon to unlock the layer and press ok now go to select and choose color range here choose shadows in select option also select grayscale in selection preview disable the invert option and press ok perfect now go to adjustment layer options and choose solid color adjustment layer here select black color and press ok now delete the bottom layer perfect now the time to save it as png format so go to file and choose save as here select png format also renamed it and press save again hit ok cool we can also add any background image so go to file and choose place select this background image and press place rescale the image by holdin

video background

Got questions?

Below are some common questions from our customers that may provide you with the answer you're looking for. If you can't find an answer to your question, please don't hesitate to reach out to us.
Contact us
In order to validate E-sign in Adobe acrobat reader, click on the eSign marked in red box. Once the user clicks on the image he will be prompted with the following window (Signature Validation Status). Click on the Signature Properties button to check signature properties.
Open the PDF file in Adobe Acrobat Reader. Click on Fill & Sign in the Tools pane on the right. Click Sign, and then select Add Signature. A popup will open, giving you three options—Type, Draw, and Image. ... Open the PDF file in Adobe Acrobat Reader. ... Click on Fill & Sign in the Tools pane on the right.
Creating a Text Watermark Create a New Layer. Start by opening your picture in Photoshop. ... Enter Your Text. With the new layer selected, choose the Text tool. ... Tweak the Font. Select the Text tool and highlight your copyright notice. ... Position the Watermark. ... Finishing Touches. ... Prepare Your Image. ... Add It to the Photo.
0:11 2:29 Transparent Signature in Photoshop | 2 Minutes Photoshop Tutorial YouTube Start of suggested clip End of suggested clip And that basically selects your signature now we are going to go ahead and add a layer mask rightMoreAnd that basically selects your signature now we are going to go ahead and add a layer mask right click on the layer mask thumbnail. And apply layer go under your adjustment. Add a hue and saturation.
8:13 12:49 Turn Your Signature Into a Watermark in Photoshop! - YouTube YouTube Start of suggested clip End of suggested clip Sign on mich 1. And click OK. And then the brushes create and take the brush. Your brush is alreadyMoreSign on mich 1. And click OK. And then the brushes create and take the brush. Your brush is already ready choose the color that you want and you can just paint.
0:21 5:44 How to Add a Signature to a PDF File in Photoshop - YouTube YouTube Start of suggested clip End of suggested clip And it just brings in our pdf. Real nice so now we're ready to add our signature. Let's come up hereMoreAnd it just brings in our pdf. Real nice so now we're ready to add our signature. Let's come up here to open.
1 Solution Open the “Messages” app. Press the “Menu” located at the upper-right corner of the screen. Choose “Settings“. Tap “Add signature to messages” to enable text message signatures, then tap “Edit signature text“. Type your desired signature, then select “OK“.
Let's dive into learning how to digitize your signature in Photoshop....You can download a free trial here. Step 1: Draw Your Signature. Start by drawing your signature in whatever medium you prefer. ... Step 2: Scan or Photograph Your Signature. ... Step 3: Clean it Up. ... Step 4: Remove the Background. ... Step 5: Integrate Your Signature.
Add your signature In the Markup toolbar in a supported app, tap. , then choose Signature. Note: If you don't see the Markup toolbar, tap. or Markup. ... Do one of the following: Add a new signature: Tap Add or Remove Signature, tap. , then use your finger to sign your name. ... Drag your signature where you want it.
Tap the Camera button or the Document button , then look for the photo or PDF that you want to attach and mark up. Tap the attachment, then tap the gray arrow icon . Tap the Markup button to add your markup. Tap the plus button to add a signature, text, and more.

See why our customers choose DocHub

Great solution for PDF docs with very little pre-knowledge required.
"Simplicity, familiarity with the menu and user-friendly. It's easy to navigate, make changes and edit whatever you may need. Because it's used alongside Google, the document is always saved, so you don't have to worry about it."
Pam Driscoll F
Teacher
A Valuable Document Signer for Small Businesses.
"I love that DocHub is incredibly affordable and customizable. It truly does everything I need it to do, without a large price tag like some of its more well known competitors. I am able to send secure documents directly to me clients emails and via in real time when they are viewing and making alterations to a document."
Jiovany A
Small-Business
I can create refillable copies for the templates that I select and then I can publish those.
"I like to work and organize my work in the appropriate way to meet and even exceed the demands that are made daily in the office, so I enjoy working with PDF files, I think they are more professional and versatile, they allow..."
Victoria G
Small-Business
be ready to get more

Edit and sign PDF for free

Get started now