Conceal information in psd smoothly

Aug 6th, 2022
Icon decoration
0
forms filled out
Icon decoration
0
forms signed
Icon decoration
0
forms sent
Service screenshot
01. Upload a document from your computer or cloud storage.
Service screenshot
02. Add text, images, drawings, shapes, and more.
Service screenshot
03. Sign your document online in a few clicks.
Service screenshot
04. Send, export, fax, download, or print out your document.

How to conceal information in psd with top efficiency

Form edit decoration

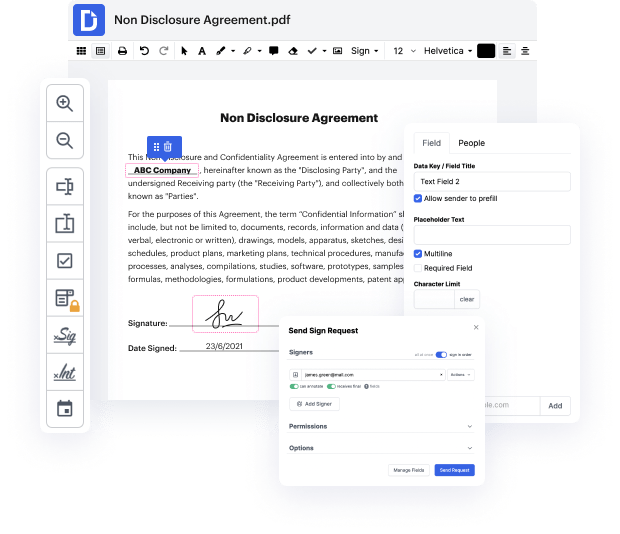
Unusual file formats in your everyday papers management and editing operations can create immediate confusion over how to edit them. You might need more than pre-installed computer software for efficient and quick document editing. If you want to conceal information in psd or make any other basic alternation in your document, choose a document editor that has the features for you to deal with ease. To handle all of the formats, such as psd, opting for an editor that actually works properly with all types of documents will be your best option.

Try DocHub for effective document management, regardless of your document’s format. It offers potent online editing instruments that streamline your papers management process. You can easily create, edit, annotate, and share any file, as all you need to access these features is an internet connection and an active DocHub account. Just one document tool is all you need. Do not waste time jumping between different applications for different documents.

Easily conceal information in psd in a few actions

  1. Go to the DocHub website, click the Create free account key, and begin your registration.
  2. Get into your current email address and create a robust password. For even faster signup, use your Gmail account.
  3. When your registration is finished, you will see our Dashboard. Add the psd by uploading it or linking it from your cloud storage.
  4. Click the added document in your document list to open it in editing mode. Make use of the toolbar above the document sheet to make all of the edits.
  5. Complete your editing by keeping the file with your documents, downloading it on your device, or sending it via DocHub without switching tabs.

Enjoy the efficiency of working with an instrument made specifically to streamline papers processing. See how effortless it really is to modify any document, even if it is the first time you have worked with its format. Sign up an account now and enhance your whole working process.

PDF editing simplified with DocHub

Seamless PDF editing
Editing a PDF is as simple as working in a Word document. You can add text, drawings, highlights, and redact or annotate your document without affecting its quality. No rasterized text or removed fields. Use an online PDF editor to get your perfect document in minutes.
Smooth teamwork
Collaborate on documents with your team using a desktop or mobile device. Let others view, edit, comment on, and sign your documents online. You can also make your form public and share its URL anywhere.
Automatic saving
Every change you make in a document is automatically saved to the cloud and synchronized across all devices in real-time. No need to send new versions of a document or worry about losing information.
Google integrations
DocHub integrates with Google Workspace so you can import, edit, and sign your documents directly from your Gmail, Google Drive, and Dropbox. When finished, export documents to Google Drive or import your Google Address Book and share the document with your contacts.
Powerful PDF tools on your mobile device
Keep your work flowing even when you're away from your computer. DocHub works on mobile just as easily as it does on desktop. Edit, annotate, and sign documents from the convenience of your smartphone or tablet. No need to install the app.
Secure document sharing and storage
Instantly share, email, and fax documents in a secure and compliant way. Set a password, place your documents in encrypted folders, and enable recipient authentication to control who accesses your documents. When completed, keep your documents secure in the cloud.

Drive efficiency with the DocHub add-on for Google Workspace

Access documents and edit, sign, and share them straight from your favorite Google Apps.
Install now

How to Conceal information in psd

4.7 out of 5
27 votes

whats up guys in this short tutorial i will show you how to hide guides in photoshop cc this should be quite an easy tutorial everything you need will be listed in the description below open up photoshop cc and navigate to view and select new guide this will create a guide which you can drag and drop on your image in order to hide or unhide guides navigate to view show and then guides or use the shortcut control and semicolon i hope this helped you out leave a comment if you have any questions and see you in the next one

video background

Got questions?

Below are some common questions from our customers that may provide you with the answer you're looking for. If you can't find an answer to your question, please don't hesitate to reach out to us.
Contact us
How to Remove Unwanted Items from a Photo in Photoshop Select the Clone Stamp Tool from the toolbar, pick a good sized brush and set the opacity to about 95%. Hold alt and click somewhere to take a good sample. Release alt and carefully click and drag the mouse over the item you wish to remove.
0:42 2:00 This is the Easiest Way to Blur Personal Information in a Video YouTube Start of suggested clip End of suggested clip You can use the blur tool which does exactly what it says or the simplified tool which uses shapesMoreYou can use the blur tool which does exactly what it says or the simplified tool which uses shapes to cover text and images.
How to Remove Unwanted Items from a Photo in Photoshop Select the Clone Stamp Tool from the toolbar, pick a good sized brush and set the opacity to about 95%. Hold alt and click somewhere to take a good sample. Release alt and carefully click and drag the mouse over the item you wish to remove.
0:53 1:53 How to Remove Text from Image in Photoshop - YouTube YouTube Start of suggested clip End of suggested clip The content aware tool select the magic wand tool from the toolbar on the left and click in theMoreThe content aware tool select the magic wand tool from the toolbar on the left and click in the first letter of the text. It will become selected. Now hold the shift key and repeat the process for all
0:04 2:32 Learn to Mask in 2 Minutes! - Photoshop Tutorial - YouTube YouTube Start of suggested clip End of suggested clip So lets just jump in and get started Im gonna look over here to my layers panel at the bottom ofMoreSo lets just jump in and get started Im gonna look over here to my layers panel at the bottom of the layers panel. I have a layer mask icon hit that to add a layer mask. Basically.
I started at the top left corner and dragged the mouse to the bottom right corner then let go of the mouse. Step 3 On the top menu of Photoshop go to Filter, then select Blur, and Finally click on Motion Blur. Step 4 A pop up display will appear and give you options for the motion blur.
Just follow these steps. Select it: Select your layer or group in the Layers panel. Reveal it: For a revealing mask, click the Add Layer Mask button in the bottom of the Layers panel. Conceal it: For a concealing mask, Alt-click (PC) or Option-click (Mac) the Add Layer Mask button. Adjust it:
Simply press Ctrl Alt 2 (Mac: Command Option 2) to load the bright pixels of the image as a selection. You will see the marching ants around the bright pixels of the image, and you can use that selection to create a Layer Mask that will target the detail in the photo.
We used the Lasso tool and left the edges of the hair outside the selection area make sure you dont include parts of the background in your selection. Then, click the Select and Mask button to enter the workspace where most of the work to finesse the hair selection will occur.
Switch to the Minus icon and paint over an area you want to hide from view. In the Select and Mask Properties panel on the right side of the workspace, try dragging the Smooth slider to the right to smooth the edge of the mask. Try dragging the Contrast slider to the right to make the edge of the mask less soft.

See why our customers choose DocHub

Great solution for PDF docs with very little pre-knowledge required.
"Simplicity, familiarity with the menu and user-friendly. It's easy to navigate, make changes and edit whatever you may need. Because it's used alongside Google, the document is always saved, so you don't have to worry about it."
Pam Driscoll F
Teacher
A Valuable Document Signer for Small Businesses.
"I love that DocHub is incredibly affordable and customizable. It truly does everything I need it to do, without a large price tag like some of its more well known competitors. I am able to send secure documents directly to me clients emails and via in real time when they are viewing and making alterations to a document."
Jiovany A
Small-Business
I can create refillable copies for the templates that I select and then I can publish those.
"I like to work and organize my work in the appropriate way to meet and even exceed the demands that are made daily in the office, so I enjoy working with PDF files, I think they are more professional and versatile, they allow..."
Victoria G
Small-Business
be ready to get more

Edit and sign PDF for free

Get started now