Obtén todo lo necesario para completar y certificar W299 MOVE X20 QSG BOOK - Timexcom assets 2025 ahora

Obtener impreso
W299 MOVE X20 QSG BOOK - Timexcom assets Vista previa en la página 1

Así es como funciona

01. Edita el impreso online
Escribe texto, añade imágenes, oculta detalles privados, añade comentarios, resalta y más.
02. Firma en pocos clics
Dibuja tu firma, escríbela, sube su imagen o utiliza tu dispositivo móvil como tableta de firma.
03. Comparte tu impreso con otros
Envíalo por correo electrónico, enlace o fax. O lo puedes descargar, exportar o imprimir.

Su opción rápida y segura para modificar y respaldar W299 MOVE X20 QSG BOOK - Timexcom assets en línea

Form edit decoration
9.5
Fácil configuración
Valoración de DocHub en G2
9.0
Fácil uso
Valoración de DocHub en G2

La habilidad de editar W299 MOVE X20 QSG BOOK - Timexcom assets y otros documentos similares con rapidez es una necesidad en el mundo actual. Y sin la solución adecuada centrada en la seguridad, este proceso puede ser extremadamente molesto, sin mencionar que conlleva riesgos. DocHub está aquí para eliminar el trabajo engorroso de completar y firmar documentos. Proporciona todas las soluciones que necesita para completar W299 MOVE X20 QSG BOOK - Timexcom assets usted mismo o enviarlo a varias partes de manera segura con tan solo unos pocos clics.

Utilice este tutorial para completar y modificar el archivo de W299 MOVE X20 QSG BOOK - Timexcom assets sin problemas:

  1. En la página del formulario, haga clic en Obtener formulario para abrirlo en el editor.
  2. Comience llenando los campos rellenables simplemente haciendo clic en ellos y escribiendo el texto.
  3. Seleccione el icono A para incluir nuevo texto, cambiar la fuente, el tamaño y el color.
  4. En su panel de control, explore otras características para anotar y modificar W299 MOVE X20 QSG BOOK - Timexcom assets, como dibujar (🖋️), resaltar (🖍️), enmascarar (🗞️), etc.
  5. Haga clic en la opción de comentario (💬) para dejar una observación personal sobre el documento.
  6. En la esquina superior derecha, encuentre la opción para descargar, compartir o enviar por correo electrónico su copia a las partes designadas.

Administrar firmas electrónicas es igualmente sencillo, siga estos pasos para certificar y enviar su W299 MOVE X20 QSG BOOK - Timexcom assets para su firma:

  1. En la misma barra de herramientas, encuentre el botón FirmarCrear firma.
  2. Elija cómo desea firmar electrónicamente W299 MOVE X20 QSG BOOK - Timexcom assets, cree su firma electrónica y guarde los cambios.
  3. Haga clic en Firmar nuevamente → seleccione su firma de la lista desplegable → certifique W299 MOVE X20 QSG BOOK - Timexcom assets con su firma.
  4. En la esquina superior izquierda, seleccione Modificar campos (📄), haga clic en el campo de firma, arrástrelo al documento y utilize nuestra configuración en la izquierda para configurar y enviar W299 MOVE X20 QSG BOOK - Timexcom assets para la firma.
  5. Monitoree el estado de finalización de su documento desde su panel de control.

Ejecute, certifique y apruebe documentos de la manera más sencilla posible. Pruebe DocHub ahora y mejore su experiencia de completar documentos mientras asegura la seguridad de sus datos en línea.

preparate para conseguir más

Rellena este impreso en 5 minutos o menos

Obtener impreso

¿Tienes alguna pregunta?

Tenemos respuestas a las preguntas más frecuentes de nuestros clientes. Si no encuentras respuesta a tu pregunta, ponte en contacto con nosotros.
Contacto

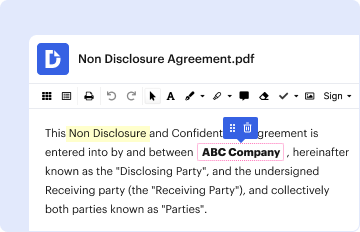
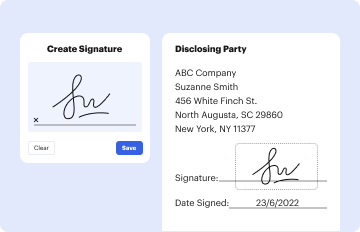
Managing your documents with DocHub this way is very straightforward once you have downloaded its extension for Google Chrome. Navigate to the Chrome Web Store and install DocHub - Sign PDF from Gmail to obtain it. Give our tool access to your Google account, and then open an email with the [KEY] attached and point to the file with your cursor - the DocHub extension button will automatically appear there. Click on it to open your document in our editor. Make any necessary modifications, fill out the blanks, and click Sign to create your legally-binding electronic signature.

As a comprehensive document editing service, DocHub is accessible on mobile phones. Open DocHub in your choice of mobile browser and use our smart mobile-friendly toolset to fill out your [KEY].

0:02 2:13 How to Set Time and Date on the Timex Ironman Classic HR (Model YouTube Start of suggested clip End of suggested clip Light. If you press and hold it it will take you into your settings. The very first setting youMoreLight. If you press and hold it it will take you into your settings. The very first setting you should see is your hour blinking its letting you know that this is what you have the option to adjust.
Your TIMEX IRONMAN Move x20 uses a built-in accelerometer to record your daily movement: steps taken, distance travelled and calories burned.
Resetting the time on our T80: Press the set button. Press the start/stop button to reset the seconds so that they begin counting from 0. Press the mode button when done. Press the start/stop button to set the desired minutes. Press the mode button when done. Press the start/stop button to set the desired hour.
preparate para conseguir más

Rellena este impreso en 5 minutos o menos

Obtener impreso

La gente también pregunta

0:00 1:14 How to Set a Timex Ironman Triathlon Watch - YouTube YouTube Start of suggested clip End of suggested clip And time then press and hold the set recall button in the upper left until the screen reads setMoreAnd time then press and hold the set recall button in the upper left until the screen reads set press the mode button to begin changing your settings starting with the time.
0:02 0:37 TIMEX WORLD TIME - SETTING TIME - HOW TO VIDEO - YouTube YouTube Start of suggested clip End of suggested clip Press the top and bottom pushers to select the closest city in your time zone. Then pull the crownMorePress the top and bottom pushers to select the closest city in your time zone. Then pull the crown out to the last position turn the crown clockwise to advance the time past 12 oclock.
Touch the watch screen to bring up your apps. Swipe left, then select Settings. Swipe down and select Factory Reset.
To reset the timer to your beginning settings, press hold the STOP/RESET button. WARNING: If the timer has already been reset, then pressing and holding the STOP/RESET button will clear all your timer intervals back to 0.
To clear all workouts, continue to hold STOP/RESET. HOLD TO CLEAR CHRONO MEM appears. Watch beeps a second time to indicate all stored workouts are erased.

Enlaces Relacionados